How to Use a Meat Slicer Machine
To use a meat slicer machine, set it up on a stable surface, adjust the thickness, secure the food on the carriage, and move the carriage smoothly past the blade. Keep hands clear of the blade, slice with light pressure, and clean the machine after every use.
On this page (12 sections)
- What should you check before you set up a meat slicer machine?
- How do you set up the machine and adjust the thickness?
- How do you load food onto the carriage?
- How do you use the food carriage for smooth slices?
- What slicing technique works for different meats?
- How do you slice safely with one hand free?
- How do you clean and store a meat slicer machine?
- How do you store sliced meat after slicing?
- What mistakes should you avoid when you use a meat slicer?
- Which tools help before and after the slicer?
- How do you know the sliced meat is ready to serve or store?
- What is the simple routine to remember for a meat slicer machine?
To learn how to use a meat slicer machine, start with a stable setup, set the slice thickness, secure chilled food on the carriage, and use smooth, steady passes. This guide explains setup, thickness adjustment, carriage operation, and cleanup in order.
A meat slicer machine rewards calm, repeatable steps. Rush the setup and the food can shift.
Rush the pass and the slice tears. Work slowly at first and you will learn how your model responds.
What should you check before you set up a meat slicer machine?
Check the blade guard, thickness control, carriage, and power cord with the machine switched off. Read your manual because controls and safety features vary by model.
Place the slicer on a level counter with room for full carriage travel. Keep the cord away from water and hot surfaces, and confirm the blade guard and food pusher or holder are fitted.
Wash your hands and use clean food. Chill cooked meats and firm cheeses before slicing so they hold their shape.
If you are trimming a roast first, our guide on best meat slicers for home use can help you match the machine to the job.
What safety checks matter most?
Keep fingertips behind the food at all times. Use the pusher or holder instead of pressing food with your hand near the blade.
Never reach toward the blade while the motor is running.
Stop the motor before you adjust the thickness, move the food, or remove slices. Unplug the machine for cleanup.
Store it with the blade covered or guarded where children cannot reach it.
How do you set up the machine and adjust the thickness?
Set up the machine on a stable surface with the blade guard in place, then choose a thickness before you start slicing. Change the thickness control one step at a time.
Turn it slowly and use your manual to confirm what the markings mean for your model. Test the setting with a small end piece.
Thin slices suit sandwiches and deli trays. Thicker slices suit steak cuts and firm vegetables.
For deli-style results, see our best lunch meat slicer guide.
How do you load food onto the carriage?
Load food flat and firm on the carriage, with the pusher or holder pressing it gently against the guide plate. The cut face should sit square to the blade.
Trim loose fat, twine, and uneven edges first. A square face makes the first slices more even.
Check our guide on a meat slicer that cuts through bone before trying bone-in pieces. Stop if a small piece would bring your fingers close to the blade.
How do you hold the food without pressing too hard?
Use light, even pressure through the pusher. Heavy pressure can bow the food and make slices uneven.
Let the blade do the cutting.
Keep your wrist straight and your arm moving with the carriage. A steady back and forth motion matters more than speed.
Stop the carriage fully at each end of the pass before you reverse direction.
How do you use the food carriage for smooth slices?
Use the carriage with short, steady passes at a consistent speed. Each pass should move the food fully across the blade.
Hesitation in the middle of a pass can leave a thicker spot.
Slide the carriage toward the blade, then draw it back. Repeat with the same pressure each time.
Listen for a change in sound, which can signal a bone, a hard gristle area, or food that has shifted.
Remove slices from the exit side with tongs or fingers kept well clear of the blade. Stack slices loosely so they do not stick together.
Pause to re-square the food if the slices start to taper.
What slicing technique works for different meats?
Use chilled, trimmed, and firmly held food for the cleanest slices. Cooked roast beef, turkey, ham, and firm cheeses slice best when cold.
Warm meat tears and smears.
For cooked roasts, slice across the grain when the recipe calls for tender pieces. For deli-style meat, keep the thickness thin and the passes even.
For thicker cuts, increase the thickness one step and test again.
If a piece shifts, stop the motor, move it back into position, and restart. Repeated small corrections beat forcing a bad pass.
For manual alternatives or comparison models, our meat slicer manual reviews cover hand-crank options.
Poultry needs extra care because bones and loose skin can catch. Trim and portion the meat first.
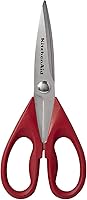
The OXO shears have curved, tapered stainless steel blades and a notch that holds bones in place, which helps when you break down a bird before cooking.
How do you slice safely with one hand free?
Keep one hand on the carriage handle and the other on the pusher for most cuts. That leaves no hand free to catch falling slices, so use tongs on the exit side.
Work at a pace where you can stop instantly. If your attention drifts, pause and reset.
Fatigue affects grip and judgment, so take a break during large batches.
Never clear a jam with the motor running. Switch it off, unplug it, and clear the food with tongs.
Check for damage to the blade guard before you restart.
How do you clean and store a meat slicer machine?
Clean the slicer after every use, with the motor off and the plug removed. Meat juices left on the blade and carriage can spoil quickly and attract bacteria.
Remove the blade guard and carriage parts only if your manual allows it. Wash removable parts in warm, soapy water, rinse, and dry them fully.
Wipe the body and guide plate with a damp cloth and dry them as well.
Do not soak the motor housing or force water into seams. Dry the blade carefully to reduce rust risk.
Store the machine in a dry place with the guard fitted.
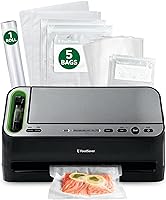
The FoodSaver V4400 has automatic bag detection and built-in roll storage with a cutter, so you can make custom bag sizes for sliced portions. Its removable drip tray catches liquid and is dishwasher safe.
Seal portions soon after slicing and refrigerate or freeze them right away.
How do you store sliced meat after slicing?
Store sliced meat in airtight portions in the refrigerator or freezer, labeled with the date. Use refrigerated slices within a few days and freeze longer portions for later use.
Spread slices in a single layer or stack them with parchment between layers. That keeps them from sticking together.
Pack small portions so you thaw only what you need.
If you cooked the meat, check doneness with a probe before slicing. Our guide on how to use a meat thermometer walks through placement and safe readings.
Food that is cooked properly and stored cold keeps its quality better after slicing.
What mistakes should you avoid when you use a meat slicer?
Avoid slicing warm food, pressing too hard, and cleaning with the power connected. These mistakes cause most torn slices and safety risks.
Do not slice rock-hard frozen meat unless your manual allows it. Thaw meat in the refrigerator until firm but pliable.
Do not force bone-in cuts through the blade. Trim around bones with a knife first, or check your model rating.
Use shears for breaking down a whole bird, and a vacuum sealer for airtight packs after slicing.
Which tools help before and after the slicer?
Use a boning knife for trimming, shears for poultry, and a sealer for storage. Each tool handles a different stage, so the slicer only has to slice.
The Victorinox Fibrox Pro boning knife has a 6 inch semi-stiff curved stainless steel blade and an ergonomic Fibro Pro handle with a non-slip grip, even when wet. It meets NSF standards and carries a lifetime guarantee against defects in material and workmanship.
Use it to trim meat square and remove meat from the bone before slicing. For storage, the FoodSaver V4400 works with 8 inch and 11 inch rolls and pre-made bags and has automatic moisture detection for an airtight seal.
How do you know the sliced meat is ready to serve or store?
Check that slices look even, separate cleanly, and feel firm rather than mushy. Torn or ragged slices often mean the food was too warm, too soft, or pressed too hard.
Taste a small piece for seasoning and texture. Adjust salt, pepper, or sauce at the tray stage rather than on the whole roast.
If you plan to smoke or grill the slices next, see can you smoke meat on a gas grill for setup ideas. For replacement guards and pushers, check best meat slicer replacement parts before you order, since a worn guard or pusher can affect safety and slice quality.
What is the simple routine to remember for a meat slicer machine?
Remember check, chill, set, secure, slice, stop, clean. That short routine covers setup, safe handling, and storage for most home slicing jobs.
Check the guard and cord, chill the food, set the thickness, secure the food on the carriage, slice with steady passes, stop before every adjustment, and clean after every use. Follow that order and your slices will improve with each batch.
Keep your manual close for model-specific steps. It holds the exact thickness markings, guard removal steps, and storage rules for your machine.
Use it first whenever a step here differs from your model.
Frequently asked questions
How do you use a meat slicer machine for the first time?
Place the slicer on a flat, stable surface, confirm the blade guard is in place, and set the thickness control before turning it on. Secure chilled meat on the carriage, start the motor, and move the carriage in steady passes.
Keep your hand behind the food and stop the motor before repositioning the meat.
What thickness should you set for lunch meat?
Start with a thin setting for deli-style slices and adjust in small steps until the slices separate cleanly. Thicker settings suit roast beef, ham steaks, and cheese.
Test one slice after each change so you do not overshoot and waste meat.
How do you clean a meat slicer machine?
Unplug the slicer and remove the blade guard and carriage parts only if the manual allows it. Wash removable parts with warm, soapy water, wipe the body with a damp cloth, and dry everything fully.
Never force water into the motor housing.