Meat Prep and Storage: The Complete Buying Guide
A vacuum sealer is the right start for meat prep and storage if you freeze meat in portions. Pair it with a boning knife, a slicing knife and bags sized for your freezer, and you can portion, seal and organize meat with less waste.
On this page (10 sections)
- What does meat prep and storage include?
- How does a vacuum sealer work for meat?
- Which vacuum sealer type fits your kitchen?
- How do you choose vacuum sealer bags?
- What tools do you need to prep meat before sealing?
- How do you grind, tenderize and inject meat?
- How do you store sealed food outside the freezer?
- How do you clean and care for meat prep tools?
- Which meat prep tools should you buy first?
- How do you seal, label and freeze meat safely?
A vacuum sealer is the right start for meat prep and storage if you freeze meat in portions. Pair it with a boning knife, a slicing knife and bags sized for your freezer, and you can portion, seal and organize meat with less waste.
This guide links to every topic cluster in meat prep and storage, from sealing and slicing to grinding, stuffing and cold storage.
What does meat prep and storage include?
Meat prep and storage covers cutting, portioning, sealing, grinding, stuffing and freezing in one workflow. You trim or break down meat, split it into meal sizes, remove air, label each pack and store it until cooking day.
If tenderizing is part of your prep, see how to use meat tenderizer powder.
The tools connect in order. A boning knife helps separate meat from bone.
A slicing knife helps cut cooked brisket or roast. A grinder and stuffer handle ground meat and sausage.
If you are considering a slicer for bone-in cuts, see whether a meat slicer can cut through bone.
A vacuum sealer then protects the finished portions.
Start with the tool you will use most. If you buy meat in bulk, the sealer and bags will pay off first.
If you break down whole cuts often, knives will matter more day to day.
A full workflow also includes a scale, labels, a marker, clean trays and a place to stage sealed packs before freezing. Those small items prevent mix ups and make a big prep session easier to finish.
Our best vacuum sealers for food storage guide covers general sealing beyond meat. Our best vacuum sealers for meat guide narrows that list to meat portions, moisture and freezer use.
Think about where each step will happen. Cutting needs light and room for a board.
Sealing needs a stable counter near a power outlet. Freezing needs clear shelf space that you can measure before a bulk buy.
Plan the order of work before you start. Trim and portion first, then seal in batches, then label and file packs while the next batch rests.
A clear sequence reduces the time meat spends at room temperature.
How does a vacuum sealer work for meat?
A vacuum sealer removes air from the bag and heat seals the opening. Less air in the pack means less contact with freezer air, which helps limit freezer burn and keeps flavors trapped in the food.
Basic home sealers pull air through the bag opening, then seal the top edge. You place an open bag in the machine, close the lid, and let the cycle run.
Moisture and liquids need care because they can interfere with a clean seal.
Place meat so it lies flat in the bag when possible. Flat packs stack well, thaw faster and take less freezer space.
Leave room near the seal edge so solids and juices do not block the seal.
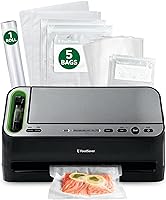
The FoodSaver V4400 uses automatic bag detection to guide the cycle. It also uses automatic moisture detection and switches to the correct mode for an airtight seal.
A removable drip tray catches overflow liquid and is dishwasher safe.
The Nesco VS-12 offers dry, moist and double seal modes with a gentle vacuum option. That control helps soft foods seal without crushing.
Its viewing window helps you confirm bag placement before the cycle starts.
Read how to use vacuum sealer machine for a step by step walk through. That guide covers bag placement, dry and moist settings and checking the seal before freezing.
How do you seal wet or marinated meat?
Wet meat needs a clean, dry seal area and a gentler pull. Wipe the bag opening, lay the meat flat and leave extra bag length above the food.
You can freeze a bag partly, then finish the seal, or use a moist setting when the machine offers one.
Marinated meat can be sealed after draining excess liquid. If you want to marinate in the bag, add the marinade, seal, then lay the bag flat to freeze.
Label the pack so you know what is inside and when you sealed it.
For very wet foods, leave more headroom in the bag than you would for dry meat. Extra length gives the machine room to pull air without drawing liquid into the seal bar.
A quick check of the seal line after the cycle can save a failed pack.
Sauces and soups need the same care as marinated meat. Lay the bag flat, keep the opening clean and let the seal cool before you move the pack.
If liquid reaches the seal area, wipe it and run a second seal when the design allows it.
Which vacuum sealer type fits your kitchen?
Choose between a countertop suction sealer, a handheld sealer and a chamber sealer. Each type suits a different amount of sealing and a different kind of food.
A countertop suction sealer uses rolls or pre cut bags. It suits regular meat portioning, meal prep and freezer storage.
Built in roll storage and a cutter help you make custom bag sizes without extra tools.
A handheld sealer works with reusable zipper style bags. It suits small households, leftovers and travel use.
It takes little space and runs on a rechargeable battery, but it cannot heat seal rolls.
A chamber sealer pulls a vacuum inside a sealed chamber. It handles liquids and soups more directly.
It also takes more counter and cabinet space than a handheld unit.
Size and weight shape daily use. The FoodSaver V4400 weighs 10 pounds and measures 11 inches by 20 inches by 12 inches.
The Nesco VS-12 weighs 6 pounds and measures 15.75 inches by 8 inches by 4.5 inches. The Chef Preserve weighs 2.2 pounds and is built as a compact handheld unit.
Power also differs by design. The FoodSaver V4400 is listed at 800 watts.
The Nesco VS-12 is listed at 130 watts with a double vacuum pump. The Chef Preserve runs on battery power and seals a bag in under 5 seconds.
See our best chamber vacuum sealer for home use guide if you seal liquids often. See our best vacuum sealer with bag storage guide if built in storage matters to you.
Which type is easiest for beginners?
A countertop suction sealer is the easiest starting point for most home meat prep. It handles rolls, pre cut bags and a wide range of portion sizes.
Guided indicators and automatic modes reduce the steps you need to learn first.
A handheld sealer is easier to store and move. It suits a few packs at a time and foods that fit its reusable bags.
It is less suited to bulk freezer batches that need custom roll sizes.
A chamber sealer can be simple once set up, but it asks for more space and care. It fits cooks who seal liquids often or want a cleaner seal on wet foods.
For a small kitchen, measure the chamber and the storage space before you choose it.
How do you choose vacuum sealer bags?
Choose bags by width, thickness and whether they are reusable. The bag must fit your sealer, hold the food without punctures and survive freezing.
For the trade-offs between vacuum sealing and zipper bags, see vacuum sealer vs Ziploc bags.
Rolls let you cut custom sizes for roasts, ribs or single portions. Pre cut bags save time and reduce waste from a bad cut.
Gallon size bags suit family portions, while quart bags suit single servings.
Textured bags help suction sealers pull air out. Smooth bags are common for chamber sealers.
Check which type your machine needs before you buy a large pack.
The FoodSaver V4400 starter kit includes an 11 inch by 10 foot roll, three quart vacuum seal bags, two gallon vacuum seal bags, three quart zipper bags and two gallon zipper bags. That mix lets you test both heat sealed bags and handheld zipper bags.
The Nesco VS-12 includes two rolls. One roll measures 8.6 inches by 9.85 feet and the other measures 11.8 inches by 9.85 feet.
Those widths cover small portions and wider flat packs for meat.
The Chef Preserve includes 30 reusable bags in small and medium sizes. The bags are listed as dishwasher, freezer, refrigerator and microwave safe and BPA free.
Reusable bags change the cost and waste picture compared with single use rolls.
Our best vacuum sealer bags for food guide compares bag types in more detail. Buy a small pack first and test it with your sealer and your most common foods.
What tools do you need to prep meat before sealing?
Prep meat with a boning knife, a slicing knife and a sturdy cutting surface. Clean tools make portioning safer and help you get even sizes that seal well.
A boning knife has a narrow, flexible blade that follows bone and joints. It helps trim fat, remove silver skin and separate muscles before you portion the meat.
Our best boning knife for meat guide covers blade length and handle shape.
A slicing knife has a long, thin blade for cooked meats. It cuts brisket, roast and deli style meats into even slices without tearing.
Our best slicing knives for brisket guide explains edge and blade length choices.
A meat cleaver handles bone in cuts and tough work at the block. It is not a replacement for a boning knife, but it helps with ribs, bones and hard cuts.
See our best meat cleaver knife guide for head weight and handle choices.
Kitchen poultry shears cut through skin, cartilage and small bones. They help portion chicken and trim poultry before sealing.
Our best kitchen poultry shears guide covers blade and spring options.
A kitchen scale helps you portion meat by weight instead of by eye. Even portions freeze, thaw and cook more predictably.
A scale also helps you label packs with a clear size that you will recognize later.
Tongs, trays and a clean towel support a smooth workflow. Trays hold trimmed meat while you work.
Tongs move meat without warming it with your hands. A towel keeps the board and counter dry for safer cutting.
Keep tools sorted by task. Use one knife for trimming, another for slicing and a separate board for raw meat when space allows.
That simple order reduces cross contact and keeps cooked foods separate from raw foods.
How do you grind, tenderize and inject meat?
Grinding, tenderizing and injecting change texture and flavor before sealing. Each tool suits a different goal, and each one changes how you portion and store the result.
A meat grinder turns trimmed meat into ground beef, pork or blends. Grind cold meat, keep the parts clean and portion the ground meat right away.
Our best meat grinders for home use guide covers hopper size, plates and motor strength.
A sausage stuffer packs ground meat into casings with less air. Less air means fewer burst casings and a better texture.
Our best sausage stuffers for home use guide covers vertical, horizontal and auger style stuffers.
A meat tenderizer tool punctures fibers with small blades or needles. It helps tough cuts cook more evenly and can help marinades reach deeper.
Our best meat tenderizer tool guide covers blade count and cleaning.
A meat injector adds brine, marinade or broth inside the meat. It helps brisket, roasts and poultry stay juicy during long cooks.
Our best meat injector gun guide covers needle size and capacity. Our best meat injector for smoking brisket guide narrows the choice for brisket cooks.
Temperature matters during grinding. Cold meat cuts cleaner and gives a better texture than meat that has warmed on the counter.
Chill the meat, the grinder parts and the bowl when you can.
Portion ground meat before sealing or freezing. Flat packs of patties or loose ground meat thaw faster than a thick block.
Label each pack with the blend, the date and the portion size.
Tenderizing and injecting work best before cooking and before long storage. Add brine or marinade, let the meat rest as directed, then seal excess marinade separately if you plan to use it again.
Clean injector needles and tenderizer heads right after use.
How do you slice meat for serving and storage?
Slice with a long, sharp blade and a steady back and forth stroke. Let cooked meat rest before slicing so juices stay in the meat.
Cut against the grain for tender slices.
For storage, slice only what you need or slice the whole piece and portion the slices. Flat packs of sliced meat thaw quickly and stack well.
Label each pack with the cut and the date.
Our best meat slicers for home use guide covers electric and manual slicers. A slicer helps with deli meats, bread and vegetables as well as cooked roasts.
Grip and board position matter as much as the blade. A stable board, a clear cutting line and a calm pace help you keep slices even.
Stop and resharpen or hone when the blade starts to tear instead of cut.
How do you store sealed food outside the freezer?
Sealed food can go in the fridge, freezer or pantry, depending on the food. Vacuum sealing slows air contact, but it does not make every food shelf stable.
Fridge storage suits cooked meats, cheeses, produce and marinated meats. Freezer storage suits raw and cooked meats, meals, soups and vegetables.
Pantry storage suits dry goods like rice, beans, flour and coffee.
The FoodSaver V4400 is described for meat that can last up to 3 years in the freezer with the system. Fridge items such as prep ahead meals, leftovers and produce can stay fresh up to weeks instead of spoiling in days.
Those figures depend on the food, the seal and the storage temperature.
The Nesco VS-12 is described for keeping meats, produce and leftovers fresh up to 5 times longer. That claim is tied to its double vacuum pump and seal modes.
Use it as a guide for planning, not as a promise for every food.
The Chef Preserve seals a bag in less than 5 seconds and is listed as suitable for meat, fish, vegetables, fruits, dry goods, pizza, cooked food and leftovers. Its reusable bags are listed for dishwasher, freezer, refrigerator and microwave use.
Ziploc slider bags suit fridge storage and simple organization without a vacuum machine. The gallon bags use Power Shield film for punctures and tears and an expandable bottom for filling.
They are reusable after hand washing and air drying, with limits noted for raw meat, fish and eggs.
Use jar sealers for dry goods in mason jars. Our best vacuum sealer for mason jars guide covers jar sizes and seal types.
Our how to use foodsaver vacuum jar sealer guide walks through the process.
Keep sealed packs organized by date and type. Store newer packs behind older packs so you use the oldest food first.
A simple list on the freezer door helps you plan meals around what you already have.
Cold storage matters on cook day as well. Our are lifetime coolers rotomolded guide helps if you hold meat cold during travel or outdoor cooks.
How do you clean and care for meat prep tools?
Clean tools right after use, before meat residue dries. Wash knives, grinder parts and sealer drip trays with hot soapy water, then dry them fully before storage.
Wipe the sealer lid and seal bar with a damp cloth. Remove liquid from the drip tray and wash it when needed.
Let the machine dry before you close the lid and store it.
The FoodSaver drip tray is patented, removable and dishwasher safe. That design makes it easier to catch overflow from moist foods and clean it without scrubbing the machine body.
Check the tray after sealing soups, marinated meat or juicy produce.
Wash cutting boards and work surfaces after raw meat. Use separate boards for raw and cooked foods when space allows.
Dry knives before you sheath or store them to limit rust.
Our how to prep a blackstone grill guide covers care for a griddle that many meat cooks use next to their prep station. A clean, seasoned surface helps with burgers, steaks and sliced meats after prep.
Store knives with guards or in a block. Store grinder parts dry and sorted by plate size.
Store bags flat and dry so rolls do not kink or collect dust.
Inspect seals, gaskets and cords as part of regular care. A worn gasket can let air leak during a cycle and ruin a batch of packs.
Replace parts when they show cracks, warping or persistent residue that will not wash off.
Which meat prep tools should you buy first?
Buy in the order of the tasks you do most. Most readers start with a sealer and bags, then add knives as they portion more meat at home.
If you freeze bulk meat, start with a countertop sealer, bags and a boning knife. If you cook for a crowd, add a slicing knife and a larger bag size.
If you make burgers or sausage, add a grinder or stuffer next.
The four products in this guide show different paths. The FoodSaver V4400 suits 2-in-1 sealing with automatic bag detection and a starter kit.
The Nesco VS-12 suits controlled sealing with dry, moist and double seal modes. The Chef Preserve suits handheld sealing with reusable bags and travel use.
The Ziploc slider bags suit simple gallon storage without a machine.
Compatibility helps you avoid extra parts. The FoodSaver V4400 works with FoodSaver 8 inch and 11 inch rolls, all pre made bag sizes, FreshSaver zipper bags, fresh containers and a quick marinator.
Optional accessories include mason jar sealers and bottle stoppers for wine and oil bottles.
The Nesco VS-12 is compatible with any brand of vacuum sealer bags. That flexibility helps if you already own rolls or plan to switch bag brands.
Check bag width against the 11.8 inch limit before you buy jumbo rolls.
The Chef Preserve uses its own reusable bags and a zipper clip in the included components. One battery charge is listed as enough to seal 1000 bags.
That portability suits travel, RVs, camping and outdoor adventures where a countertop unit is not practical.
Pick the path that matches your routine. A simple setup you use weekly will help more than a full set that stays in a box.
Add one tool at a time and learn its care routine before you buy the next one.
How do you seal, label and freeze meat safely?
Seal meat in meal sized portions and freeze it flat. Label each pack with the cut, the date and the portion size.
That routine makes thawing and cooking simple.
Trim excess fat or bone when it helps the pack lie flat. Place the meat in the bag, wipe the seal area and run the sealing cycle.
Check the seal for gaps, wrinkles or liquid in the seal line.
Lay packs flat to freeze. Stack them like files in the freezer so you can see each label.
Thaw in the fridge when time allows, and cook thawed meat promptly.
Do not reuse bags that held raw meat for other foods without washing them well. Follow the bag maker's guidance on reuse.
When in doubt, use a fresh bag for the next pack.
A simple label system prevents freezer waste. Write the cut, the portion, the date sealed and the date to use first.
Use a permanent marker that will not smear when the pack is cold.
Freeze packs in a single layer at first when space allows. Flat packs freeze faster and more evenly than thick stacks.
Once firm, you can file them upright to save space.
Keep a short inventory list on the freezer door or in a notes app. Cross off packs as you use them and add new packs after each prep session.
That habit turns a full freezer into a planned menu instead of a mystery box.
This guide is the complete entry point for the meat prep and storage category. Use the links above to go deeper on sealers, knives, grinders, slicers and storage.
Start with a vacuum sealer that fits your bags and freezer, then build the rest of your kit around the meat you cook most.
Frequently asked questions
What is a vacuum sealer used for in meat prep?
A vacuum sealer removes air from a bag and heat seals it shut. That limits air contact during freezing and helps keep portioned meat, meals and leftovers fresh for longer in the fridge or freezer.
Do I need a boning knife and a vacuum sealer together?
Many home cooks use both. A boning knife helps trim and portion meat before sealing, while the sealer locks each portion in its own bag.
Our guide to the best boning knife for meat covers blade choice.
Chamber sealer or suction sealer for home use?
A suction sealer is common for home use and works with textured bags. A chamber model can handle liquids more directly.
Compare options in our guide to the best chamber vacuum sealer for home use.
Which bags work with a vacuum sealer?
Most home sealers use rolls or pre cut bags made for vacuum sealing. Check bag width, thickness and whether the bag is textured on one side.
Our guide to the best vacuum sealer bags for food explains the choices.