How to Use a FoodSaver VS2200 Vacuum Sealer
To use a FoodSaver VS2200 vacuum sealer, place the open end of the bag in the vacuum chamber, close the lid, select Dry or Moist, and press Seal. The machine removes air, melts the seal bar, and stops when the cycle is complete.
On this page (11 sections)
- How does the FoodSaver VS2200 sealing sequence work?
- What controls should you check before you start?
- How do you load a bag for a clean seal?
- When should you use Dry, Moist, or Gentle settings?
- What is the best way to seal meat, produce, and leftovers?
- How do you make custom bags from a vacuum sealer roll?
- How do you fix weak seals, leaks, and chamber errors?
- Which products help with this sealing routine?
- How should you clean and store the VS2200 after use?
- What mistakes should you avoid with a FoodSaver VS2200?
- Which FoodSaver VS2200 setup should you choose?
To use a FoodSaver VS2200, load the bag, close the lid, pick Dry or Moist, and let the machine vacuum and heat seal in one cycle. This guide explains how to use a FoodSaver vacuum sealer VS2200 from bag prep through the seal check.
You will get the best results when you treat each step as a small check. Bag position matters more than force.
How does the FoodSaver VS2200 sealing sequence work?
The VS2200 sealing sequence works in four steps: load, close, select, and wait for the cycle to finish. The vacuum pump runs first, then the heat bar melts the bag material into a seal.
Start with the bag open end inside the vacuum chamber. Before substituting bags, check which bags a vacuum sealer can use.
The smooth side of the bag should sit flat under the lid.
Close the lid fully and press down until it locks. Select the setting that matches your food, press the vacuum and seal control, then leave the machine alone until it stops.
After the cycle ends, open the lid and lift the bag out carefully. Flex the seal gently to check that it is flat and continuous.
What controls should you check before you start?
Check the lid gasket, seal bar, bag size, and food moisture before you press any button. Those four items cause most failed seals.
Look at the foam gasket around the chamber and remove crumbs, moisture, or pieces of bag material. Check the seal bar when the machine is cool and unplugged.
Measure the bag against the chamber before you load food. The bag needs enough length at the top for the seal and enough room inside for air to leave.
Our guide to how to use vacuum sealer rolls walks through roll sizing and first seals.
Think about moisture next. Dry foods seal easily.
Wet foods need the Moist setting and often need pre-freezing.
How do you load a bag for a clean seal?
Load the bag with the open end flat in the chamber and the seal area dry and smooth. See how to use vacuum sealer bags for more bag-loading steps.
This simple setup helps the pump remove air without pulling food into the seal.
Add food first, then create the seal. For a roll, cut a piece longer than you need, seal one end, then load the food.
Leave space at the top of the bag. Flatten the top with your fingers and push out folds near the opening.
Keep the seal area dry. Place the bag so the opening sits fully inside the chamber.
If part of the opening sits outside the lid line, air will enter during the cycle.
When should you use Dry, Moist, or Gentle settings?
Use Dry for solid foods, Moist for wet foods, and Gentle when pressure can crush soft items. The choice still matters even though the controls are simple.
Dry mode suits rice, grains, nuts, dried fruit, and frozen hard items. These foods release little liquid.
Moist mode suits soups, sauces, marinated meat, and juicy produce. Pre-freezing a liquid in a tray, then sealing it, often works better than sealing it soft.
Gentle settings, when available, suit bread, berries, and soft baked goods. If you are new to this type of machine, compare the step order in how to use nesco vacuum sealer.
What is the best way to seal meat, produce, and leftovers?
Seal each food type by starting with a dry surface, enough bag length, and the right moisture setting. Small changes in prep make a large difference in seal quality.
For meat, pat the surface dry and remove sharp bones that can puncture the bag. If slicing cooked meat before sealing, follow these meat slicer steps.
Leave extra length at the top, because meat can release liquid during storage.
For produce, dry washed vegetables and fruit before sealing and seal in portions you will use at once.
For leftovers, cool the food before sealing. Hot food creates steam, and steam can weaken a seal.
Label each bag with the food name and date.
A good vacuum sealer for this routine should handle the bag width you use most.
How do you make custom bags from a vacuum sealer roll?
Make custom bags by cutting a piece longer than needed, sealing one end, loading the food, then sealing the open end. This method lets you match the bag to the portion.
Unroll the material and cut with the built-in cutter or scissors. Keep the cut edge straight.
Seal the first end before adding food. Run the same load, close, select, and seal steps.
Let the seal cool, then turn the bag around for loading.
Our guide to how to use vacuum sealer rolls covers roll storage, first seals, and common sizing mistakes. If you plan to store jars as well as bags, compare the best vacuum sealer jar attachment for the lid sizes you own.
How do you fix weak seals, leaks, and chamber errors?
Fix weak seals by checking the gasket, seal area, bag texturing, and lid lock before you repeat the cycle. Most problems trace back to one of those four areas.
A wrinkled seal often means the bag moved during the cycle. Smooth the opening again and leave more length at the top.
A bag that will not hold vacuum may have a puncture. Fill it with air, press it gently, and listen for leaks.
If the pump runs but does not pull air, check the lid lock and gasket. Let the machine cool, dry the chamber, and pre-freeze wet foods next time.
For a broader look at machines that handle these jobs, see the best vacuum sealers for food storage.
Which products help with this sealing routine?
Three products help in different ways. A full-size FoodSaver gives you automatic detection, a Nesco gives you more seal controls, and a compact handheld unit suits small jobs.
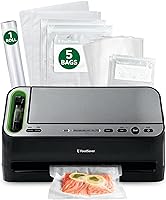
The FoodSaver V4400 2-in-1 Vacuum Sealer Machine is the closest match in this group for a FoodSaver workflow. It has automatic bag detection, automatic moisture detection, built-in roll storage, and a cutter.
It also includes an 11 in x 10 ft roll, quart and gallon bags, and zipper bags. FoodSaver says the system works with 8 in and 11 in rolls and pre-made bags.
Check the best foodsaver vacuum sealer accessories for jar sealers, canisters, and other add-ons.
The Nesco Deluxe Food VS-12 Vacuum Sealer takes a different approach. It has a 130-watt double vacuum pump, Dry, Moist, and Double seal modes, and a Gentle vacuum option.
An easy-lock handle and viewing window help you check bag placement. The kit includes an 8.6 in x 9.85 ft roll and an 11.8 in x 9.85 ft roll.
If you want more control over soft or wet foods, see how to use nesco vacuum sealer for the mode steps.
The Chef Preserve Compact Vacuum Sealer for Food suits small, portable jobs. It is a battery-powered handheld unit that seals in about 5 seconds and includes 30 reusable bags.
The bags are dishwasher, freezer, refrigerator, and microwave safe according to Chef Preserve. It is a poor fit if you need to seal wide rolls or large freezer portions.
If counter space is tight, compare the best small vacuum sealer options before you choose a full-size machine.
How should you clean and store the VS2200 after use?
Clean the VS2200 by letting it cool, wiping the chamber and seal bar, and storing it with the lid open or unprotected. That routine protects the gasket and keeps the next seal clean.
Unplug the machine after the seal bar cools. Wipe the chamber with a damp cloth and dry it fully before you close the lid.
Check the drip tray or chamber area for liquid. Empty and dry that area after wet foods.
Store the machine flat and dry. Keep the lid closed only if the manual allows it.
Store rolls in a cool, dry place away from direct heat.
If you also seal jars, check the best vacuum sealer for mason jars before you buy a jar accessory.
What mistakes should you avoid with a FoodSaver VS2200?
Avoid short bags, wet seal areas, hot food, and opening the lid too soon. Those mistakes cause most failed seals.
Do not cut the bag too short. The machine needs room for the seal bar and room for air to escape.
Do not seal hot food. Steam adds moisture and can soften the seal.
Cool food first, then seal it.
Do not ignore a dirty gasket or overfill the bag. Clean the chamber after every session with wet foods and leave space between the food and the seal area.
Do not rush the cool-down. Opening the lid early can peel a seal that looks complete.
For the FoodSaver system as a whole, see the best foodsaver vacuum sealer accessories.
Which FoodSaver VS2200 setup should you choose?
Choose a full-size FoodSaver with automatic detection if you seal often, a Nesco if you want more seal modes, and a compact handheld unit for small jobs. The best choice depends on bag width and food type.
If you already own the VS2200, start with its built-in Dry and Moist controls. Practice on dry foods first.
Then move to moist foods with pre-freezing and extra bag length.
If you are buying new gear, match the chamber to your largest bag. Measure roasts, bulk meal packs, and roll width before you decide.
For a full-size FoodSaver route, the V4400 in this guide offers automatic bag detection and moisture detection. For manual mode control, the Nesco VS-12 offers Dry, Moist, and Double seals.
For travel or small portions, the Chef Preserve handheld unit is the compact option.
Keep the VS2200 routine simple: flat bag, dry seal area, correct mode, full cycle, then a seal check. That sequence handles most foods you will seal at home.
Frequently asked questions
What is the correct bag sealing sequence on a FoodSaver VS2200?
Load food, insert the open bag end into the chamber, close and lock the lid, choose Dry or Moist, and press the vacuum and seal button. Wait for the machine to finish, open the lid, and check the seal.
A clean, dry seal area helps the bar form an airtight line.
How do I seal wet food on a FoodSaver VS2200?
Select the Moist setting and pre-freeze liquids or juicy foods when possible. Keep liquid away from the seal area, leave extra bag length at the top, and stop the cycle early if liquid starts moving toward the chamber.
A firmer, drier surface gives the heat bar a cleaner seal.
What bags work with a FoodSaver VS2200?
Use vacuum sealer bags or rolls made for heat sealing, sized to fit your chamber. FoodSaver 8 in and 11 in rolls and pre-made bags are a common match for FoodSaver machines.
Our guide to how to use vacuum sealer rolls explains sizing, first seals, and storage.
Why is my vacuum seal weak or wrinkled?
Weak seals often come from a wet or folded seal area, a bag that is too short, or a crowded chamber. Smooth the bag flat, wipe the opening, and leave enough room for air to escape.
Check the gasket and seal bar for crumbs before running another cycle.