How to Use Vacuum Sealer Bags
To use vacuum sealer bags, pick a bag that fits the food, fill it partway, keep the opening clean and flat, and seal it with a compatible vacuum sealer. Check the seal, label it, and store it at the right temperature.
On this page (11 sections)
- How to use vacuum sealer bags step by step
- What size vacuum sealer bag should you pick?
- How do you prepare a bag before filling it?
- What foods need extra care before sealing?
- How do you position the bag in the sealer?
- What do you do when the seal looks weak?
- How do you store sealed bags safely?
- Which sealer works well with vacuum sealer bags?
- How do you choose bags for meat, food, and small portions?
- What mistakes should you avoid with vacuum sealer bags?
- How do you reopen and use sealed food?
To use vacuum sealer bags, pick a bag that fits the food, fill it partway, keep the opening clean and flat, and seal it with a compatible vacuum sealer. Check the seal, label it, and store it at the right temperature.
Learning how to use vacuum sealer bags is mostly about bag prep and placement. A good seal starts before the machine runs, because food position, moisture, and a clean opening all affect the result.
How to use vacuum sealer bags step by step
Use a vacuum-ready bag, fill it about two-thirds full, flatten the open end, and seal it in a compatible machine. Work on a clean counter so the opening stays dry.
- Choose a bag with room for food plus space at the top.
- Add food in one layer where you can, keeping pieces away from the open end.
- Wipe the opening if juice or crumbs reached it.
- Flatten the top 2 to 3 inches and smooth out folds.
- Place the open end in the sealer as the guide shows.
- Run the cycle, then check the seal after it cools.
If you are new to the machine, our guide to how to use vacuum sealer machine covers the settings and button order.
What size vacuum sealer bag should you pick?
Pick a bag wider and longer than the food, with extra room at the open end. Too small a bag forces food into the seal area and makes a weak seal more likely.
Quart bags suit single servings and small amounts of meat. Gallon bags suit steaks, roasts, and chicken pieces.
If you seal for one or two people, best small vacuum sealer bags can help you match bag size to portion size.
Rolls let you cut a bag to the length you need. That helps with long items, such as ribs or fish fillets.
Our guide on how to use vacuum sealer rolls explains cutting and sealing the first end. Precut bags are faster, since each bag is ready to fill.
How do you prepare a bag before filling it?
Wash your hands, open the bag fully, and keep the outside dry before you add food. A clean work area helps you avoid crumbs and moisture on the seal surface.
If the bag is a roll, cut it longer than you think you need. You can trim excess later, but you cannot add length after the first seal.
Seal one end, check that it holds, then fill the bag.
For liquids, fill the bag while it stands in a tall jar or pitcher. The tall sides hold the bag open and reduce spills near the opening.
Freeze soups and sauces flat in a tray first when you want a thin, stackable pack.
Label the bag before or right after sealing. Write the food, amount, and date.
What foods need extra care before sealing?
Dry surfaces seal best, so pat meat, fish, and produce dry before you bag them. Extra moisture can be pulled into the seal area during vacuuming.
Trim tough fat, bones, and sharp edges that could poke the bag. If you grind meat before storage, see how to use a meat grinder for the prep steps.
Boning and trimming are easier with a knife made for the job, and sharp points are a common cause of pinhole leaks.
For trimming meat before it goes into a bag, this knife helps you work close to the bone.
The Victorinox Fibrox Pro boning knife has a 6 inch stainless steel blade and a curved shape for cutting around bone. Victorinox says the Fibrox Pro handle gives a non-slip grip, even when wet.
That grip helps when you trim a roast or break down a chicken before sealing.
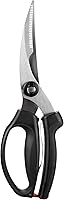
Chicken and poultry need a different tool for cutting through joints and bone. Shears can portion a whole bird into pieces that fit a bag without tearing it.
The OXO Good Grips Spring-Loaded Poultry Shears have stainless steel blades with a notch to hold bones in place. OXO says the spring-loaded handles add leverage and reduce hand strain.
The blades separate for cleaning, which helps after cutting raw poultry.
How do you position the bag in the sealer?
Keep the open end flat, dry, and fully inside the vacuum chamber or seal area. Folds, twists, and wet spots are the most common reasons a seal fails.
Smooth the top of the bag between your fingers before you insert it. Lay the bag flat so the opening lines up evenly across the seal bar.
If the bag is wide, make sure both sides sit flat and neither side curls under.
For a chamber sealer, the bag goes inside the chamber and the lid closes over it. For an external sealer, only the open end goes into the machine channel.
The steps differ, so follow the guide for your machine type.
Do not let food press against the seal bar. If a tall item reaches the opening, remove some food or use a larger bag.
What do you do when the seal looks weak?
Let the seal cool, then press and check it before you store the bag. A hot seal can shift, so a quick check right after the cycle may not show the full result.
Look for a flat, continuous line with no gaps, wrinkles, or food caught in it. Try a gentle tug on both sides of the seal.
If it opens or feels thin in spots, cut the bag open above the seal, fix the problem, and seal again.
Moisture often causes a poor seal. If liquid moves toward the opening during vacuuming, pause the cycle if your machine allows it.
Dry the opening, add headspace, and try again. Sharp bones, shells, and frozen edges can also puncture plastic, so trim sharp points, pad them, or move the food to a new bag.
How do you store sealed bags safely?
Store sealed bags at the temperature your food needs, and label each one with the date. Vacuum sealing slows quality loss, but it does not make food safe at the wrong temperature.
Freeze thicker meats and flat packs in a single layer at first. That helps them freeze faster and stack neatly later.
Once frozen, you can stand packs upright to save space.
Keep raw meat sealed until you thaw it in the fridge or in cold water. Cook it soon after thawing.
Do not thaw sealed meat on the counter. Keep fridge bags away from ready-to-eat food.
If a bag leaks or smells off, discard the food. Our buying guide to a vacuum sealer can help if your machine struggles with wet food.
Which sealer works well with vacuum sealer bags?
A 2-in-1 machine suits most home users because it seals bags and also handles handheld accessories. That flexibility matters if you seal meat weekly but also want to reseal containers or zipper bags.
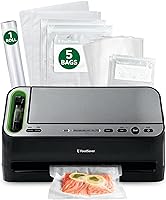
The FoodSaver V4400 2-in-1 Vacuum Sealer Machine includes an 11 inch by 10 foot roll, 3 quart vacuum seal bags, and 2 gallon vacuum seal bags. FoodSaver says automatic bag detection helps the machine seal the bag, and automatic moisture detection switches to the correct mode.
Built-in roll storage and a cutter let you make custom sizes.
That starter kit is useful for learning how to use vacuum sealer bags because you get rolls and precut bags in one box. You can test which size fits your usual portions before you buy more bags.
How do you choose bags for meat, food, and small portions?
Match the bag to the food first, then to the portion you will actually eat. Meat, produce, and dry goods have different moisture levels and storage needs.
For raw or cooked meat, look for bags made for meat storage and freezing. Our guide to best vacuum sealer bags for meat compares options for steaks, ground meat, and roasts.
For general freezer and fridge use, best vacuum sealer bags for food covers wider food types.
Ask whether the bag will be frozen or only refrigerated. Freezer use calls for a bag that stays flexible when cold.
Our post on can vacuum sealer use any bag explains why regular storage bags are not a safe substitute for vacuum-ready bags.
What mistakes should you avoid with vacuum sealer bags?
Avoid overfilling, sealing a wet opening, and storing food at the wrong temperature. Those three mistakes cause most failed seals and poor results.
Do not seal hot food. Let it cool safely in the fridge first, then portion and seal it.
Hot food creates steam and can keep the seal area wet.
Do not reuse a bag that held raw meat for a different food. Use a new bag for a new batch when in doubt.
Do not assume a tight vacuum means food will last forever. Storage time still depends on the food and the temperature, and pallet fuel is a separate topic, so see How Long Does a Bag of Wood Pellets Last? for that question instead.
How do you reopen and use sealed food?
Open the bag with clean scissors or a knife, away from the seal line. Cut below the seal so you keep the bag intact if you need to reseal it.
If you sealed a roll into a custom bag and left room below the seal, you may be able to seal it again after use. Wash the opening, dry it, and run a new seal.
If the bag is too short or damaged, move the food to a new bag. For frozen meat, thaw it in the fridge or in a sealed bag under cold water, and cook it the same day when possible.
Once cooked, you can portion and seal it again. Clean your sealer after wet foods by wiping the seal area and drip tray as the manual directs, for a more reliable seal next time.
Frequently asked questions
How do I use vacuum sealer bags for the first time?
Start with a bag made for vacuum sealing and a compatible sealer. Add food, leave room at the open end, flatten that end, place it in the sealer, and follow the machine steps.
Check that the seal is flat and unbroken before you label and store the bag.
Can a vacuum sealer use any bag?
No. A standard vacuum sealer needs a bag made for that type of machine, because the bag texture and seal layer matter.
Our guide on whether a can vacuum sealer use any bag explains the difference between regular bags, rolls, and zipper bags.
How full should a vacuum sealer bag be?
Fill most bags about two-thirds to three-quarters full. That leaves room to flatten the opening and keep food away from the seal area.
Very full bags are harder to vacuum and more likely to leak at the seal.
How do I stop liquid from ruining a seal?
Pat wet food dry, leave extra headspace, and flatten the bag opening before sealing. You can also freeze liquids or soups flat first, then seal them.
If liquid reaches the seal bar, stop, clean and dry the opening, and seal again.