How to Use a Vacuum Sealer Machine
To use a vacuum sealer machine, fill the bag, wipe the seal area, place the open end in the chamber, and let it vacuum and heat seal. Choose dry, moist, or double seal mode for the food, then store it in the freezer or fridge.
On this page (9 sections)
- How to use a vacuum sealer machine step by step
- What bag should you use for sealing food?
- How do you prepare food before sealing
- How do you load the bag and start the cycle
- What settings should you choose for dry and moist food
- How do you check the seal and store the bag
- How do you fix weak seals and common mistakes
- Which machine suits your kitchen and how should you care for it
- How do you get started with your first seal
To use a vacuum sealer machine, fill the bag, wipe the seal area, place the open end in the chamber, and let it vacuum and heat seal. Choose dry, moist, or double seal mode for the food, then store it in the freezer or fridge.
The basic cycle is the same across most models. You prepare the bag, remove air, seal the edge, and check the result.
How to use a vacuum sealer machine step by step
The cycle is fill, clean, load, vacuum, seal, and check. Each step takes less time once you know the order.
- Cut or select a bag that fits the food with room at the top.
- Fill the bag and leave about 2 to 3 inches of empty space at the open end.
- Wipe the inside of that top area so no food or liquid remains.
- Open the machine and place the bag end flat in the vacuum chamber.
- Close and lock the lid so the bag end sits straight across the seal bar.
- Select dry, moist, or double seal mode, then start the cycle.
- Wait for the machine to finish, open the lid, and check the seal.
Keep the counter clear before you start. You will need a clean towel and a marker for labels and dates.
What bag should you use for sealing food?
Use bags and rolls made for vacuum sealing, not regular storage bags. The texture on vacuum sealer bags helps the machine remove air.
Roll stock is useful when portions vary. You cut the length you need, seal one end, fill it, then seal the other end.
Our guide to how to use vacuum sealer rolls explains cutting, sealing the first end, and storing the roll.
Pre-made bags are faster for repeat portions. Quart size suits single servings, and gallon size suits whole roasts, large cuts of meat, or family meals.
Zipper versions suit foods you open and reseal often.
Match bag size to the food. A bag that is too small will press food into the seal area.
A bag far larger than needed may form wrinkles.
How do you prepare food before sealing
Cool food, pat it dry, portion it, and leave headspace at the top. That prep sets up a clean seal.
Meat seals best in flat portions. For grinding meat before portioning it, follow how to use a meat grinder.
Spread burgers, chops, or fish in a single layer so they freeze fast and stack well.
For ground meat, flatten it in the bag before sealing.
For moist foods, freeze soups, sauces, or marinated meat in a container first. Then move the solid block into a bag and seal it.
That keeps liquid away from the seal bar.
For dry goods, beans, rice, and flour, fill the bag and press out excess air before sealing. Delicate foods such as bread and berries may need a gentle vacuum setting so the machine does not crush them.
Label each bag with the food name and the date. Labels help you use older food first and avoid mystery packages.
How do you load the bag and start the cycle
Lay the open end flat, lock the lid, choose the seal mode, and press start. The machine does the vacuuming and heating.
Open the lid and check the seal bar and gasket for crumbs. Wipe them with a clean, dry cloth.
A clean bar helps the bag melt into a strong line.
Place the bag end across the bar with the textured side in the correct position for your model. Smooth out wrinkles with your fingers.
Close the lid until the latch clicks.
Select the mode. Dry mode suits rice, nuts, and dry beans.
Moist mode suits meat with juices, cooked food, and marinated items. Double seal adds a second line for extra safety.
Press the start button and keep the lid closed. Some machines stop on their own when the vacuum is complete.
Others need you to press seal when the vacuum reaches the right level.
What settings should you choose for dry and moist food
Use dry mode for dry foods and moist or double mode for foods with liquid. The setting changes how long the machine seals and how strong the line is.
The Nesco VS-12 offers dry, moist, and double seal modes, plus a gentle vacuum option for soft foods. That choice matters for berries, bread, and marinated meat, where strong suction can crush the food or pull liquid into the seal.
For juicy meat, choose moist mode first. If the seal looks thin or liquid reached the edge, seal the same bag again with double mode.
If you use a vacuum sealer for weekly meal prep, moist mode will be your most common choice.
For liquids and soups, freeze the food solid first when you can. That step protects the seal bar and gives you a cleaner line.
Our picks for the best vacuum sealer for liquids focus on machines and modes that handle this job.
For dry goods, dry mode is enough. It seals fast and keeps the cycle short.
How do you check the seal and store the bag
The seal should be smooth, flat, and free of wrinkles or gaps. Check it before you put the bag away.
Run your fingers along the sealed line. It should feel solid and even.
Look for bubbles, folds, or food caught in the melt. If you see a problem, cut the bag open, clean the top, and seal it again with fresh headspace.
Store frozen food flat to save space. Flat bags stack like folders and thaw faster.
Keep the freezer at 0°F for frozen food storage.
Store fridge food at 40°F or below. Use sealed leftovers within a few days, and use sealed raw meat promptly after thawing.
Vacuum sealing slows spoilage, but it does not make food last forever.
How long can you store vacuum sealed food
Vacuum sealed meat in the freezer keeps best for up to 1 to 3 years in quality terms, while fridge items last days to weeks. FoodSaver says meat preserved with its system in the freezer can last up to 3 years and still taste fresh.
Your result depends on the food, the seal quality, and storage temperature. Ground meat and fatty fish lose quality faster than lean cuts.
Dry goods last longest when kept cool and dry after sealing.
Use the oldest bags first. Write the date on each bag so you can rotate stock without guesswork.
How do you fix weak seals and common mistakes
Most seal problems come from a dirty bag edge, a wrinkled bag, or too much food near the top. Fix those three things first.
Wipe the inside of the bag end with a clean, dry paper towel. If liquid is present, pat the area dry.
Flatten the bag so the top edge sits straight.
If the seal is weak, try a longer seal time or double seal mode. Check that the lid locked fully and the gasket is clean.
A crumb under the gasket can let air leak during the cycle.
If the machine pulls liquid into the chamber, stop, clean the drip tray if your model has one, and freeze the food first next time. The V4400 has automatic moisture detection and a removable drip tray that is dishwasher safe.
If the bag seals but the food looks crushed, use a gentle vacuum setting or add a paper towel layer above delicate food. That buffer protects soft items while the machine removes air around them.
Why does the bag wrinkle at the seal
Wrinkles form when the bag is too long, the food is too close to the top, or the bag shifts as the lid closes. Trim extra length, add headspace, and smooth the top flat before locking the lid.
For wide bags on a narrow machine, fold the excess sides under and smooth them into the chamber. A straight line across the seal bar beats a folded pile.
Which machine suits your kitchen and how should you care for it
Pick the machine that fits your food, your space, and how often you seal. The three models here cover different habits.
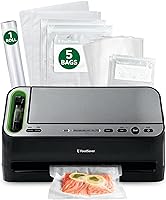
The FoodSaver V4400 is a 2-in-1 system with automatic bag detection, a built-in roll storage area, and a cutter. It works with 8-inch and 11-inch FoodSaver rolls, pre-made bags, zipper bags, and containers.
The Nesco VS-12 is a compact 130-watt sealer with a double vacuum pump, double heat seal, dry and moist modes, and a gentle vacuum option. It includes two bag rolls, one 8.6 by 9.85 inches and one 11.8 by 9.85 inches.
The Chef Preserve is a handheld, rechargeable sealer that comes with 30 reusable bags. It suits small portions, lunch prep, and travel use where a countertop machine is too large.
Care for any model by wiping the seal bar and gasket after each session and emptying the drip tray when needed. Store rolls in the built-in compartment or a cool, dry cupboard.
If you seal meat often, compare the best vacuum sealers for meat for seal strength and bag width. Nesco owners should read how to use a Nesco vacuum sealer for mode details.
How do you get started with your first seal
Start with dry food and a pre-made bag to learn the cycle, then move to moist foods. That order builds skill without waste.
Seal a bag of rice or nuts first. You will learn the lid latch, the button sequence, and what a good seal looks like.
Then try raw meat or cooked leftovers with moist mode.
Use the best vacuum sealers for food storage if you want to compare countertop models by bag width, seal modes, and storage features. Pick one machine, learn its cycle, and label every bag.
The rule is simple: clean bag edge, flat load, correct mode, check the seal. Follow that order each time and your food will store cleaner and longer.
Frequently asked questions
How long does it take to learn how to use a vacuum sealer machine?
Most people learn the basic cycle in one session. Measure a bag, fill it with food, clean the open edge, lock it in place, and start the cycle.
After two or three bags, you will know how much headspace your food needs and which seal mode works best.
Can I vacuum seal cooked food?
Yes, you can seal cooked meat, soups, sauces, and leftovers after cooling them safely. Cool food quickly, portion it, and use a moist or double seal for foods with liquid.
Store cooked food in the fridge for short-term use or freeze it for longer storage.
Why is my vacuum seal weak or leaking?
Weak seals often come from food or liquid on the bag edge, a wrinkled bag, or a dirty seal bar. Wipe the inside of the open end, lay it flat, and check that the bag sits straight in the chamber.
A second seal helps with moist foods.
Do I need special bags for a vacuum sealer machine?
Yes, use textured vacuum sealer bags or rolls made for heat sealing. Regular zipper bags will not heat seal.
Roll stock lets you cut custom sizes, while pre-made bags save time for common portions.