How to Use a KitchenAid Sausage Stuffer
To use a KitchenAid sausage stuffer, assemble the stuffer tube on the mixer, load the soaked casing over the nozzle, and feed seasoned ground meat in small pushes at low speed. Keep the meat cold, fill the casing evenly without air pockets, and twist links to length.
On this page (11 sections)
- How do I assemble a KitchenAid sausage stuffer attachment?
- What casings and meat work best with a KitchenAid stuffer?
- How do I load the casing onto the stuffer tube?
- How do I feed meat through the KitchenAid sausage stuffer?
- How do I avoid air pockets and bursts while stuffing?
- What tools help you trim meat before stuffing?
- When should I choose a dedicated stuffer instead?
- How do I clean and store the stuffer after use?
- How should I cook and store the sausage I just stuffed?
- What should I do if my KitchenAid stuffer keeps jamming?
- How do I get started with a KitchenAid sausage stuffer?
To use a KitchenAid sausage stuffer, assemble the stuffer tube on the mixer, load the soaked casing over the nozzle, and feed seasoned ground meat in small pushes at low speed. Keep the meat cold, fill the casing evenly without air pockets, and twist links to length.
Treat the stuffer as a gentle filler, not a press. The mixer pushes the meat, but your hands control the casing, the pace, and the final shape.
How do I assemble a KitchenAid sausage stuffer attachment?
Assemble the attachment before you grind or season the meat, so cold meat is ready when the stuffer is on. Check your manual, because tube size and ring placement vary by model.
Wash the tube, rings, and any plate or screw parts in warm, soapy water. Rinse, dry, and check the tube for nicks that could tear a casing.
Attach the housing to the mixer head as directed. Slide the tube into place and secure it with the ring or collar so it sits straight with no wobble.
Choose the tube for your casing. A narrower tube suits breakfast links and snack sticks.
A wider tube suits larger casings and brats. Keep a small bowl of water nearby to wet your hands and the casing outside.
What casings and meat work best with a KitchenAid stuffer?
Use casings made for stuffing and meat that stays cold and partly fatty. The casing sets link size, and the meat mix sets texture and flavor.
Natural hog casings give a snap when cooked. Collagen casings are more uniform and can be easier for beginners.
Soak either type in warm water as the package directs, and keep them in clean water while you work.
Rinse casings before use to remove salt or preservative. Take out one length at a time so the rest stay wet.
Choose ground meat with enough fat to stay juicy. A mix with about 20 to 30 percent fat is a common starting point for fresh links.
Lean meat makes dry sausage and more air pockets. Season fully before stuffing, and taste a small cooked sample first to adjust the batch.
How do I load the casing onto the stuffer tube?
Load the casing in water, with wet hands, and with the tube pointing up. This keeps the casing from tearing or trapping air.
Rinse one soaked casing under a gentle stream to clear salt from the inside.
Hold the open end over the tube and slide the casing on slowly in short sections. Wet your fingers as you go and leave the last few inches hanging free, or tie it closed if your recipe directs.
Do not stretch the casing tight. It should rest with a little slack, since a kink at the nozzle becomes a weak spot under pressure.
Push a small amount of meat through to clear water or air from the tube.
How do I feed meat through the KitchenAid sausage stuffer?
Feed the meat in small handfuls at the lowest mixer speed. Your free hand guides the casing and sets the fill, while the mixer pushes meat through.
Place seasoned meat within easy reach and start the mixer on its lowest setting. Add a small amount at the feed opening and let it move toward the tube.
Watch the casing as it fills. It should swell evenly and slide off the tube.
If it balloons in one spot, pause and smooth that section with wet fingers.
Keep the casing under light, steady tension. Too much pull stretches it thin.
Too little lets it bunch and trap air. Stop often to twist a link to length, alternating direction for each link so it does not unravel.
How do I avoid air pockets and bursts while stuffing?
Avoid air pockets and bursts by filling firm but not tight, and by keeping the casing wet. Most problems show up as a soft spot, a sudden bulge, or a split near the nozzle.
Air pockets feel like soft bubbles. Pierce a pocket with a clean needle, then press gently to release the air.
Wipe away any meat that escapes.
Bursts often mean the casing was stretched or the meat was pushed too fast. Slow the mixer, add meat in smaller amounts, and let the casing expand on its own.
Keep the outside moist, as dry casing tears more easily at the tube tip.
Our guide to the best kitchenaid sausage stuffer attachment can help you match tube size and casing type to your mixer.
What tools help you trim meat before stuffing?
Trim meat with a narrow boning knife and poultry shears that can reach tight spots. For bone-related slicer limits, see whether a meat slicer cuts through bone.
Clean prep means fewer chewy bits in the finished link.
The Victorinox Fibrox Pro boning knife has a 6 inch curved, semi-stiff stainless steel blade and a non-slip Fibro Pro handle. Its pointed tip starts cuts near bone, and the curve follows the contour of the meat.
Use a boning knife for removing silver skin, sinew, and hard fat. For a comparison with fillet knives, see boning knife vs fillet knife.
Work with the blade curved away from your holding hand, using short, controlled strokes.
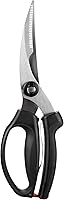
The OXO Good Grips Spring-Loaded Poultry Shears have curved, tapered stainless steel blades and spring-loaded handles. The notch holds bone in place, and the blades separate for cleaning.
Our comparison of poultry shears vs kitchen shears explains when shears beat a knife. For sausage prep, shears suit small cuts and casing work, while the boning knife handles larger trim.
When should I choose a dedicated stuffer instead?
Choose a dedicated stuffer when you make large batches often or want faster, more even fills. A KitchenAid attachment is fine for small home batches, but it has limits as volume grows.
Dedicated stuffers use a piston or auger designed only for filling. They move meat with less squeezing, give more control, and hold more meat at once.
A mixer attachment feeds through a tube that can slow down with fatty mixes. It also ties up your mixer for the whole session, which is tedious for a full freezer batch.
Our list of the best sausage stuffers for home use compares those options side by side. For volume beyond home use, see the best commercial sausage stuffer guide.
For a low cost, hands on option, read the best manual sausage stuffer guide. For setup steps, see manual sausage stuffer steps.
How do I clean and store the stuffer after use?
Clean the stuffer while the parts are still wet and before meat dries on them. A quick wash now saves scrubbing later.
Remove the tube and rings from the mixer. Scrape off meat with a plastic tool, then wash every part in warm, soapy water and rinse well.
Check inside the tube with your finger. Meat can hide in a thin film that soap misses.
Run a bottle brush or wet cloth through the tube to clear it.
Dry all parts fully before storage. Water left in the tube can cause odor and rust on metal parts.
Let the tube air dry upside down on a clean towel.
Store the tube and rings in a dry drawer, separate from sharp knives if you can. Follow the manual for any oiling or care notes.
How should I cook and store the sausage I just stuffed?
Cook fresh sausage until its center reaches a safe internal temperature, then store extras cold or frozen. Safe handling keeps the batch worth eating.
For grilling, our guide on how to gas grill sausage covers indirect heat and common timing mistakes. See how long to grill sausage on gas grill for times by thickness and type.
Refrigerate fresh links right after stuffing and use them within a few days. Keep them in a covered container so they do not dry out or pick up odors.
Freeze links in a single layer on a tray first. Once firm, move them to a freezer bag or container so you can take out only what you need.
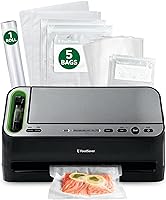
Our vacuum sealer buying guide explains bag sizes and seal settings for home meat prep.
What should I do if my KitchenAid stuffer keeps jamming?
Fix jamming by checking tube size, meat temperature, and casing fit first. Most jams trace back to one of those three causes.
A tube too narrow for the casing slows the fill and raises pressure. Switch to a wider tube or larger casing and try again with a small amount of meat.
Warm or over mixed meat smears and plugs the tube. Chill the meat, stir it less next time if it looks paste like, then stuff in small pushes at the lowest speed.
A dry or kinked casing catches at the tube tip. Wet it again, straighten any kink, and reload with slack.
Keep a bowl of water at your side for quick fixes.
If the jam persists, stop the mixer and clear the tube. Push meat back out, rinse the tube, and start with fresh casing.
How do I get started with a KitchenAid sausage stuffer?
Start with a small batch, cold meat, and a casing size that fits your tube. That first run teaches you the pace better than any long list of tips.
Soak and rinse the casings, assemble the stuffer, and load one casing with wet hands. Feed seasoned meat in small handfuls at low speed, and twist links to length as you go.
Pierce any air pockets right away.
Trim and portion meat before you start, and keep everything cold until it reaches the tube. A boning knife and shears make that prep faster and safer.
Clean the stuffer right after you finish, and store links cold or frozen. When you are ready to cook, use the sausage grilling guides and a vacuum sealer for freezer packs.
Frequently asked questions
How do you load a casing on a KitchenAid sausage stuffer?
Soak the casing, rinse it inside and out, then slide it over the stuffer nozzle and feed it on loosely so it can slide off as meat fills it. Keep the free end tied or pinched as directed for your casing, and leave enough slack at the nozzle for the first push of meat.
Why does sausage burst when using a KitchenAid stuffer?
Bursting usually means the casing was overfilled, the meat was packed too tight, or the stuffer speed was too high. Slow the mixer, feed meat in small amounts, and stop when the casing feels firm but still has a little give.
Can you stuff sausage with a KitchenAid without a stuffer attachment?
You can use a long stuffer tube or a dedicated stuffer, but the mixer attachment gives the most control for most home batches. A grinder attachment with a stuffing plate can work in a pinch, yet it pushes meat harder and can make texture less even.
How should you store homemade sausage after stuffing?
Refrigerate fresh links promptly and use them within a few days, or freeze them in a single layer before bagging. A vacuum sealer helps remove air from the package and keeps freezer burn at bay during longer storage.