How to Use a FoodSaver Vacuum Jar Sealer
To use a FoodSaver vacuum jar sealer, connect the accessory tube to the jar sealer and the vacuum sealer port, place the sealer on the jar lid, and run the vacuum cycle until the lid pulls tight. Check the lid, label the jar, and store it cool and dry, with refrigerated foods kept refrigerated.
On this page (10 sections)
- What do you need before you start sealing jars?
- How do you connect the accessory tube and jar sealer?
- How do you place the lid and jar sealer correctly?
- How do you use Foodsaver vacuum jar sealer step by step?
- Which foods seal well in vacuum jars?
- How do you prep meat before jar sealing?
- How do you check, label, and store sealed jars?
- Why won't a jar seal, and how do you fix it?
- When should you choose bags, jars, or containers?
- What are the best jar sealer mistakes to avoid?
To use a FoodSaver vacuum jar sealer, connect the accessory tube to the jar sealer and the vacuum sealer port, place the sealer on the jar lid, and run the vacuum cycle until the lid pulls tight. This guide explains how to use Foodsaver vacuum jar sealer steps in order, including lid placement and safe storage.
You will also see where a vacuum sealer fits with bags and containers.
A jar sealer needs a vacuum sealer with an accessory port, a clean jar, a flat lid, and a band. The machine pulls air from the jar, and the lid seals as pressure drops.
What do you need before you start sealing jars?
You need a compatible vacuum sealer, a jar sealer, clean jars, lids, bands, and the accessory tube. Check that the tube fits both ends without forcing it.
A loose tube can leak air and stop the lid from sealing.
Use jars with smooth rims and lids that sit flat. Wipe the rim clean and dry before you add food.
Food on the rim is the most common reason a lid will not pull down.
Leave headspace at the top. Dry foods need less space than moist foods, but every jar needs room for air removal.
Overfilling can pull liquid into the sealer.
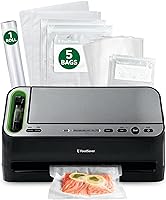
If you plan bags and jars in the same session, a machine that handles both saves counter space. The FoodSaver V4400 2-in-1 Vacuum Sealer Machine combines a standard bag sealer with a handheld sealer for containers and canisters.
How do you connect the accessory tube and jar sealer?
Connect one end of the tube to the vacuum sealer accessory port and the other end to the jar sealer fitting. Push each end in straight until it seats.
Twist only if the fitting is made to lock.
Place the vacuum sealer on a flat counter with the port clear of walls and cords. Keep the tube short enough that it does not kink.
A kink can reduce suction and leave a weak seal.
Check the tube for cracks or flattened spots before each use. FoodSaver says the V4400 works with regular and wide mouth mason jar sealers as optional accessories, so match the sealer to your lids.
For more options, see best vacuum sealer jar attachment.
Do not connect the jar sealer to the bag sealing channel. The tube must go to the accessory port or handheld port made for attachments.
How do you place the lid and jar sealer correctly?
Place the lid on the jar first, then the band, then the jar sealer on top of the lid. The sealer should sit centered and flat.
If it rocks, check the rim for chips or food residue.
Use good quality flat lids that match the jar size. A bent lid or a lid with a damaged sealing ring may not seal fully.
The band should screw on snugly but not need force.
Press the jar sealer down lightly with one hand while you start the cycle. Steady contact keeps the seal surface in place while air leaves the jar.
For wide mouth jars, use a wide mouth sealer. For regular mouth jars, use a regular sealer.
Mixing sizes is a frequent cause of a lid that lifts at one edge.
How do you use Foodsaver vacuum jar sealer step by step?
Run the vacuum cycle, watch the lid pull down, then release the sealer and test the lid. Most machines will signal when the vacuum step ends, or the suction sound will change.
Start with the jar upright on the counter. Keep the tube end away from food and liquid.
Keep your hand clear of the sealer while the machine runs.
Some vacuum sealers need you to press and hold a button. Others run once you press vacuum.
Follow your machine controls, but keep the same order for every jar.
Once the cycle ends, lift the jar sealer straight up. Do not twist it off.
Twisting can disturb a fresh seal.
Test the lid after a few minutes. Press the center.
It should stay down and not flex. If it lifts, the jar did not seal.
Which foods seal well in vacuum jars?
Dry pantry foods seal best because they do not release moisture. Rice, beans, flour, sugar, coffee, tea, nuts, seeds, spices, dried fruit, and powdered milk are good first choices.
Vacuum jars keep these foods dry and slow staling.
Cooked meals, sauces, and cut vegetables can also go in jars, but they need refrigeration or freezing. Leave extra headspace and wipe the rim twice.
Raw meat needs cold storage and safe handling. For a measured seasoning step before cooking, see how to use meat tenderizer powder.
Trim and portion meat before sealing when possible, and keep it at safe fridge or freezer temperatures.
Jar sealing does not replace refrigeration for raw meat.
If you are choosing a system for both bags and jars, compare best vacuum sealer for bags and jars. That format helps you decide whether your main use is pantry jars, freezer bags, or a mix.
How do you prep meat before jar sealing?
Prep meat with clean tools, a clean surface, and cold storage close by. For sausage prep, see the KitchenAid sausage stuffer guide.
Trim fat and silver skin before portioning, so you do not need to reopen a sealed jar later. For barbecue seasoning ideas, browse the best BBQ rubs.
Keep raw meat cold while you work.
A boning knife helps you trim close to the bone. For the differences between knife types, read boning knife vs fillet knife.
The Victorinox Fibrox Pro boning knife has a 6 inch curved, semi-stiff stainless steel blade and a non-slip Fibro Pro handle for wet work.
Use poultry shears for skin, small bones, and tough tissue. The OXO Good Grips Spring-Loaded Poultry Shears have curved, tapered stainless steel blades, micro-serrated edges, and spring-loaded handles that reduce hand strain.
Wash hands, tools, and surfaces after raw meat work. A clean sealed jar cannot make contaminated prep safe.
How do you check, label, and store sealed jars?
Check the lid center, the label, the storage temperature, and the date before you put the jar away. A sealed lid should stay down and hold when you lift the jar by the edges.
If the lid flexes, refrigerate the food and use it soon or reseal it with a new lid.
Write the food name and the seal date on the lid or jar. Use a marker that will not smear in the fridge.
Rotate older jars to the front.
Store dry jars in a cool, dark, dry place. Store cooked food, cut produce, and meat in the fridge or freezer.
Vacuum sealing slows spoilage, but it does not make perishable food shelf stable.
Keep jars upright during storage. Check lids after a temperature change.
For storage beyond jars alone, best vacuum sealer containers can show how rigid containers handle leftovers and dry goods that do not suit glass jars.
Why won't a jar seal, and how do you fix it?
A jar fails to seal for a dirty rim, a mismatched lid, a loose tube, or too little headspace. Fix one cause at a time and test with a fresh lid.
Do not keep retrying the same warped lid.
Clean and dry the rim with a fresh cloth. Check the lid edge for bends and the jar rim for chips.
Swap to a new lid if either part is damaged.
Reseat the tube at both ends. Make sure the sealer sits flat and centered.
If food or liquid entered the tube, clean or replace it before the next jar.
Add headspace if the jar is too full. If every jar fails, test the vacuum sealer on a bag or container to check whether the problem is the machine, the tube, or the jar setup.
A Nesco VS-12 Deluxe vacuum sealer review can help if you are comparing machines.
When should you choose bags, jars, or containers?
Choose jars for dry pantry foods, bags for freezer meals, and containers for daily fridge use. Jars protect dry goods from crushing and make scooping easy.
Bags save space in the freezer and mold to the shape of the food.
Bags also work well for marinated meat. You can flatten a bag to freeze it and stack it with other bags.
For the bag side of storage, are vacuum sealer bags reusable explains limits on reuse.
Jars suit foods you open often, like coffee or nuts, because the lid comes off without cutting a bag. Containers suit leftovers you want to reheat or serve from.
Many homes use all three formats in one system.
A vacuum sealer vs ziploc bags comparison can help you decide where vacuum sealing adds value. Use vacuum sealing for long storage and zip bags for short fridge use.
What are the best jar sealer mistakes to avoid?
Avoid sealing warm food, skipping the label, and storing perishable jars at room temperature. Warm food creates steam and condensation that can weaken a seal.
Label every jar so you can judge freshness by date.
Do not reuse lids that are bent, rusted, or dented. Do not force a sealer onto the wrong lid size.
Do not fill jars to the brim.
Do not assume a sealed jar means the food is safe forever. Check for off odors, mold, or a loose lid before you eat.
When in doubt, throw it out.
For a wider shortlist of jar focused machines, see best vacuum sealer for mason jars. That guide helps you match jar size, lid type, and machine features.
Frequently asked questions
How do I know a jar has sealed?
Press the center of the lid after the cycle. A sealed lid should not flex up and down, and it should resist being lifted by the edges.
Wait until the jar reaches room temperature before testing dry foods, and refrigerate wet foods right away.
Can I seal any jar with a FoodSaver jar sealer?
No. Use clean jars made for canning or storage with lids that fit the sealer size.
The jar sealer works with regular and wide mouth mason jar sealer designs from FoodSaver, so match the sealer to the lid width before you start.
Should jars be refrigerated after vacuum sealing?
Yes, for most moist or perishable foods. Vacuum sealing slows quality loss but does not make food shelf stable like canning.
Keep meat, cooked meals, and cut produce cold, and use dry pantry foods only when the jar stays sealed and dry.