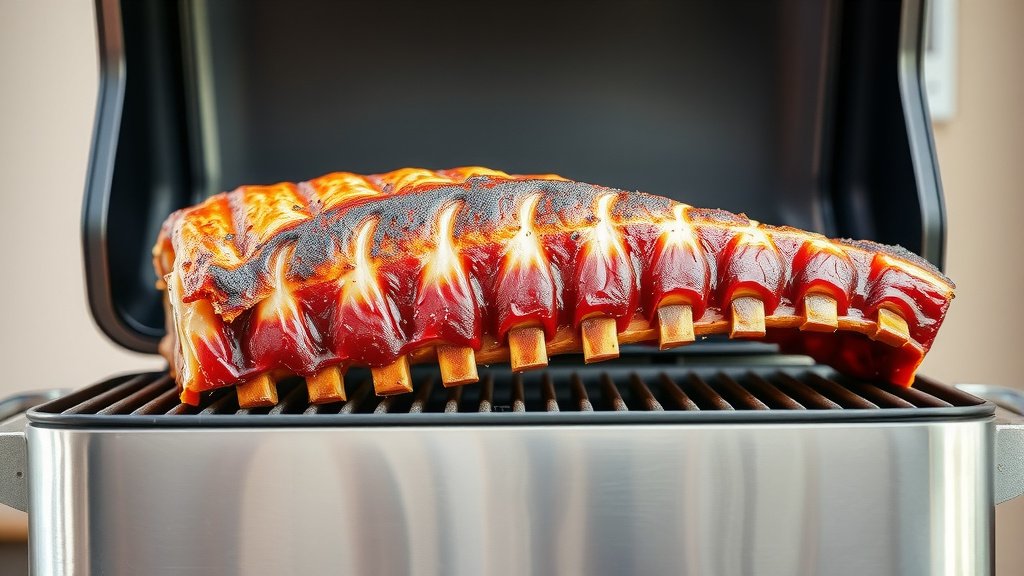
To smoke baby back ribs on a pellet grill, you typically follow the 3-2-1 method: three hours smoking, two hours wrapped, and one hour unwrapped. This approach ensures your ribs are incredibly tender and packed with smoky flavor.
You’ll want to maintain a consistent temperature of around 225-250°F throughout the smoking process, using a flavorful wood pellet like apple or cherry for the best results.
TL;DR: Here’s a quick roadmap to amazing smoked baby back ribs:
- Choose high-quality baby back ribs, remove the membrane.
- Apply a generous dry rub for flavor.
- Smoke at 225-250°F for 3 hours (unwrapped).
- Wrap tightly in foil with liquid for 2 hours.
- Unwrap and smoke for 1 more hour, adding sauce if you like.
- Rest before slicing for maximum juiciness.
How To Smoke Baby Back Ribs On A Pellet Grill?
Smoking baby back ribs on a pellet grill is a journey to tender, flavorful perfection. This guide will walk you through each step, making you a pitmaster in no time.
Understanding Baby Back Ribs
Baby back ribs come from the loin section of the hog, near the spine. They are smaller and meatier than spare ribs, offering a tender, lean bite that many people prefer. We find that their size makes them perfect for quicker smoking times.
Why a Pellet Grill is Great for Ribs
Pellet grills offer fantastic temperature control and consistent smoke output. This means less fiddling with vents and more time enjoying the process. You get a steady flow of smoke, creating a beautiful smoke ring and deep flavor.
Essential Tools You’ll Need
Before you start, gather your equipment. Having everything ready makes the process smoother. Think of it like a chef preparing their ingredients; preparation is key.
- Pellet Grill and Wood Pellets (Apple or Cherry are popular choices)
- Sharp Knife
- Cutting Board
- Meat Thermometer (leave-in is great, instant-read is a must)
- Aluminum Foil or Butcher Paper
- Spray Bottle (optional, for spritzing)
- Tongs or Heat-Resistant Gloves
Preparing Your Baby Back Ribs
The secret to incredible ribs starts long before they hit the grill. Proper preparation makes a huge difference in the final taste and texture. Don’t skip these steps!
Removing the Membrane
Flip your ribs meat-side down. You’ll see a thin, silvery membrane on the bone side. This membrane gets tough when cooked, preventing rub from penetrating. We found that gently prying it up with a butter knife or spoon handle, then pulling it off with a paper towel, is the easiest way to remove it.
Trimming Excess Fat
Look for any large, loose pockets of fat on the ribs. While some fat adds flavor, excessive amounts can make the ribs greasy. Trim away any obvious chunks, but don’t go overboard; a little fat is good. Many experts say to leave about a quarter-inch of fat for moisture.
Applying Your Dry Rub
Now for the flavor! A good dry rub is essential. Apply it generously to all sides of the ribs, pressing it gently to help it stick. You can use a store-bought rub or make your own. We recommend letting the ribs sit with the rub for at least 30 minutes, or even overnight in the fridge, allowing the flavors to meld deeply.
The 3-2-1 Smoking Method Explained
The 3-2-1 method is a widely accepted approach for fall-off-the-bone ribs. It breaks the smoking process into three distinct stages. Think of it as a three-act play for your ribs, each act building to a delicious climax.
Stage 1: The Smoke Phase (3 Hours)
Set your pellet grill to 225-250°F. Once it reaches temperature, place your seasoned ribs directly on the grates, bone-side down. Close the lid and let the smoke work its magic for three hours. This phase creates a beautiful smoke ring and infuses that signature smoky flavor.
Spritzing for Moisture (Optional)
Some grillers like to spritz their ribs every hour or so during this phase. A mix of apple cider vinegar, water, or apple juice works well. This helps keep the surface moist and can add a little extra flavor. We found that spritzing can improve bark formation, though it’s not strictly necessary.
Stage 2: The Wrap Phase (2 Hours)
After three hours, it’s time to wrap the ribs. Lay out two sheets of heavy-duty aluminum foil (or butcher paper) for each rack. Place the ribs meat-side down on the foil. Add a splash of liquid inside the wrap – apple juice, beer, or even a little BBQ sauce work great. This creates a moist, steamy environment, making the ribs incredibly tender. Wrap them up tightly, sealing all edges. Put them back on the grill for two more hours at the same 225-250°F temperature.
Stage 3: The Finish Phase (1 Hour)
Unwrap the ribs after two hours. You’ll notice how tender they are. At this point, you can brush them with your favorite BBQ sauce if you wish. Return the unwrapped ribs to the grill for the final hour. This allows the sauce to set and the bark to firm up. Many experts say this final stage also lets the smoke kiss the ribs one last time, adding a final layer of smoky goodness.
Checking for Doneness
How do you know when your ribs are perfect? Here are a few reliable indicators:
The internal temperature should reach around 195-203°F. This is where the connective tissue breaks down, leading to tenderness (Cleveland Clinic). You can also perform the “bend test”: pick up a rack of ribs with tongs in the middle. If the ends droop significantly and cracks appear on the surface, they are likely done. Another good sign is when the meat has pulled back from the ends of the bones, exposing about a quarter-inch of bone.
| Phase | Duration | Temperature | Notes |
|---|---|---|---|
| Smoke | 3 hours | 225-250°F | Unwrapped, apply dry rub. |
| Wrap | 2 hours | 225-250°F | Wrapped in foil with liquid. |
| Finish | 1 hour | 225-250°F | Unwrapped, optional sauce. |
Resting Your Ribs
Once your ribs are done, resist the urge to slice them immediately. Just like a steak, ribs benefit from a rest. Transfer them to a cutting board, loosely tent them with foil, and let them rest for 10-15 minutes. This allows the juices to redistribute, resulting in moister, more flavorful ribs. You’ve come this far, don’t rush the finish!
Slicing and Serving
After resting, slice your ribs between the bones. Serve them warm with your favorite sides – maybe some coleslaw, baked beans, or cornbread. There’s nothing quite like biting into a perfectly smoked baby back rib that you made yourself. Go ahead, take a bow, pitmaster.
Troubleshooting Common Rib Issues
Even seasoned grillers run into small hiccups sometimes. What if your ribs aren’t as tender as you hoped? Or perhaps they’re too dry? We found that often the issue is simply a matter of temperature or time. If they’re not tender enough, they likely needed more time in the wrap phase. If dry, perhaps too much fat was trimmed or the temperature was too high. Practice makes perfect, so don’t get discouraged!
Rib Smoking Checklist:
- Choose quality ribs.
- Remove the membrane.
- Apply dry rub generously.
- Preheat pellet grill to 225-250°F.
- Follow the 3-2-1 method timing.
- Check for doneness using bend test/temp.
- Rest before slicing.
Conclusion
Smoking baby back ribs on a pellet grill is a rewarding experience. By following the 3-2-1 method, paying attention to preparation, and giving your ribs proper rest, you’ll consistently create incredibly tender and flavorful results. It’s a process that builds anticipation, and the reward is always worth the wait. Enjoy the delicious journey and the smiles at your table!
Can I use another wood pellet flavor besides apple or cherry?
Absolutely! While apple and cherry are popular for pork, you can experiment with other fruitwoods like pecan or even a mild hickory. The key is to choose a pellet that complements the pork without overpowering it. Many experts suggest avoiding very strong woods like mesquite for ribs, as they can sometimes create an overly intense flavor.
What if my ribs aren’t “fall-off-the-bone” tender?
If your ribs aren’t as tender as you like, they likely needed more time in the wrap phase (Stage 2) or the final smoking phase (Stage 3). Tenderness comes from the breakdown of connective tissues, which requires sufficient time at temperature. Try extending the wrap time by 30 minutes to an hour next time, or ensuring your grill maintained a consistent temperature throughout the cook. The bend test is your best friend here.
Is it okay to use store-bought BBQ sauce, or should I make my own?
Using a good quality store-bought BBQ sauce is perfectly fine and convenient! There are many fantastic options available that can elevate your ribs. If you enjoy cooking, making your own sauce can be a fun project that allows you to customize flavors. Either way, apply it during the last hour of smoking to allow it to set without burning.
Can I smoke frozen baby back ribs?
No, you should never smoke ribs directly from frozen. Always thaw your baby back ribs completely in the refrigerator before preparing them. Smoking frozen meat can lead to uneven cooking, and it’s much harder for the rub and smoke flavor to penetrate properly. Thawing safely ensures food safety and better results.
How do I store leftover smoked ribs?
Allow any leftover smoked ribs to cool completely, then wrap them tightly in aluminum foil or place them in an airtight container. Store them in the refrigerator for up to 3-4 days. To reheat, you can use your oven at a low temperature (around 250°F), wrapping them again in foil to prevent drying out, until they are heated through. Some people even enjoy them cold!