To grill bone-in chicken thighs on a gas grill perfectly, preheat your grill to a medium-high heat (around 400°F), then reduce to medium-low (300-325°F) for cooking. Place the thighs skin-side down over indirect heat initially for crispy skin, then move them to direct heat if needed, flipping regularly until they reach an internal temperature of 175°F.
Achieving tender, juicy bone-in chicken thighs on a gas grill involves balancing heat management and consistent temperature checks to ensure even cooking without burning the skin.
- Get started by preheating your gas grill to a steady medium-low heat for consistent cooking.
- Always prepare your chicken thighs with a simple seasoning or marinade for better flavor.
- Use a reliable meat thermometer to ensure your chicken reaches a safe internal temperature of 175°F.
- Mastering indirect and direct heat zones is key for crispy skin and juicy meat.
- Don’t forget to let your chicken rest after grilling to lock in all those delicious juices.
How To Grill Bone In Chicken Thighs On Gas Grill?
Grilling bone-in chicken thighs on a gas grill requires careful heat management and patience. You will want to use a two-zone grilling method, starting with indirect heat to cook through, then finishing over direct heat for crispy skin.
Gather Your Grilling Essentials
Before you even think about lighting that grill, a little preparation goes a long way. Think of it like a chef prepping their ingredients. You need your chicken, seasoning, and tools ready to go.
Choosing the Right Thighs
When selecting bone-in chicken thighs, look for ones that are roughly the same size. This helps them cook evenly. We found that fresh, plump thighs often yield the best results.
Must-Have Grilling Tools
You’ll need tongs, a meat thermometer, and a basting brush if you plan to use a sauce. A clean grill brush is also important for grating before you start.
Prepping Your Chicken Thighs for the Grill
The secret to delicious grilled chicken often starts long before it hits the grates. Proper preparation ensures flavor penetrates and skin gets crispy.
Seasoning for Success
A simple salt and pepper rub is often enough, but feel free to get creative. Many experts say a good rub applied at least 30 minutes beforehand allows the flavors to meld (Cook’s Illustrated). Pat the chicken dry first for better seasoning adherence and crispier skin.
Consider a Marinade or Brine
For extra juicy and flavorful chicken, a marinade or brine can work wonders. A simple brine of water, salt, and sugar for an hour or two can make a big difference. We found that marinades with acidity, like lemon juice or vinegar, also help to tenderize the meat.
Setting Up Your Gas Grill for Bone-In Chicken
Heat management is the real MVP when grilling bone-in chicken. A gas grill makes creating different heat zones super easy, which is exactly what you need.
The Two-Zone Setup
Turn one or two burners to medium-low and leave the others off. This creates a direct heat zone (over the lit burners) and an indirect heat zone (over the unlit burners). This method is often recommended for thicker cuts of meat like bone-in thighs.
Preheating is Key
Always preheat your grill with the lid closed for 10-15 minutes. Aim for a medium-low temperature in the indirect zone, around 300-325°F. This consistent temperature helps prevent burning and promotes even cooking.
The Grilling Process: Step-by-Step
Now for the main event! Follow these steps to ensure your bone-in chicken thighs come out perfectly cooked and delicious.
- Clean Grates: Brush your grill grates clean. A clean grate prevents sticking and those nasty char marks.
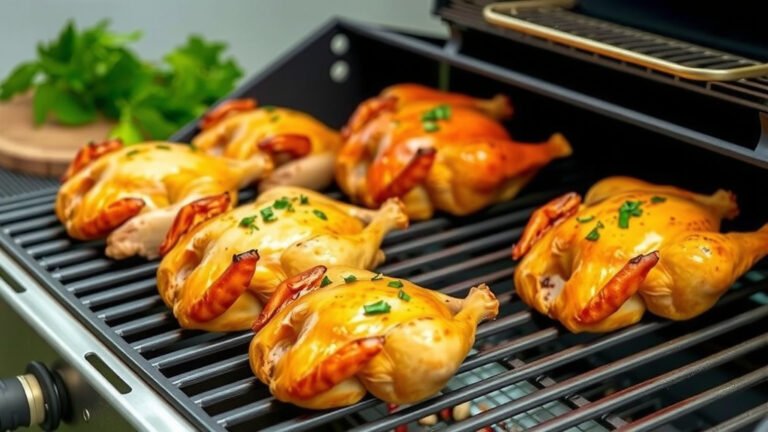
- Initial Placement: Place the chicken thighs skin-side down over the indirect heat zone. This allows the fat to render slowly and the skin to crisp without burning.
- Cook Indirectly: Close the lid and let them cook for about 20-30 minutes, checking occasionally. This helps the chicken cook through gently.
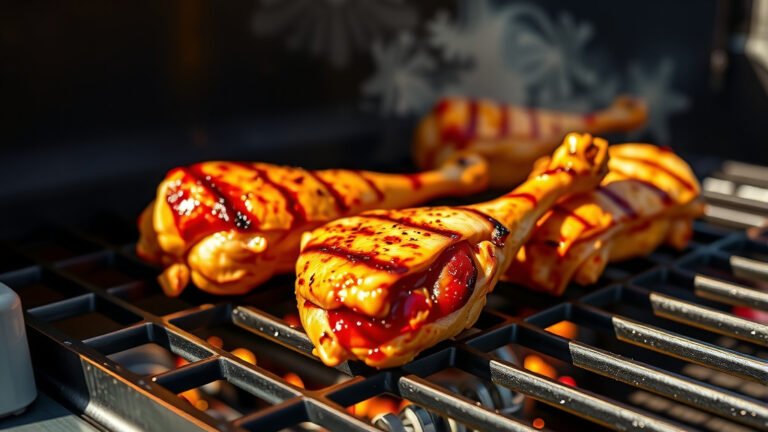
- Flip and Finish: Flip the chicken and move them over the direct heat zone for 3-5 minutes per side. This is where you get those beautiful grill marks and finalize the crispiness.
- Temperature Check: Use your meat thermometer to check the internal temperature in the thickest part of the thigh, avoiding the bone. You’re aiming for 175°F.
| Stage | Grill Temp (Indirect) | Time | Notes |
|---|---|---|---|
| Initial Cook | 300-325°F | 20-30 mins | Skin-side down, over indirect heat |
| Flip & Finish | Medium Direct Heat | 3-5 mins per side | For crisping and grill marks |
| Final Temp | N/A | Until 175°F | Check thickest part of meat, not bone |
Ensuring Safe Internal Temperature
Food safety is paramount. Many guidelines point to 175°F as a safe internal temperature for bone-in chicken thighs (USDA). This ensures the chicken is cooked through and safe to eat.
The Importance of a Meat Thermometer
Don’t guess! A reliable meat thermometer is your best friend here. Insert it into the thickest part of the thigh, making sure not to touch the bone. The bone can give a false reading.
Resting Your Grilled Chicken Thighs
You’ve done the hard part. Now, resist the urge to cut into that chicken right away. Resting is a simple step that makes a huge difference.
Why Rest is Best
After removing the chicken from the grill, place it on a clean cutting board and tent it loosely with foil. Let it rest for 5-10 minutes. This allows the juices to redistribute throughout the meat, resulting in a more tender and juicy bite.
Troubleshooting Common Grilling Challenges
Even seasoned grillers face challenges. Don’t worry if things don’t go perfectly the first time. We all learn from experience.
Dealing with Flare-Ups
Fat dripping from the chicken can cause flare-ups. If this happens, simply move the chicken to the indirect heat zone until the flames subside. This prevents burning and uneven cooking.
Preventing Dry Chicken
Overcooking is the main culprit for dry chicken. Always rely on your meat thermometer and pull the chicken off the grill as soon as it hits 175°F. Remember, a little carryover cooking will occur during the rest.
Quick Checklist for Grilling Success
- Grill Cleaned: Fresh grates prevent sticking.
- Chicken Prepped: Seasoned and patted dry.
- Two-Zone Heat: Indirect for cooking, direct for crisping.
- Thermometer Ready: Essential for food safety and perfection.
- Resting Spot: Ready for juicy results.
- Patience: Don’t rush the process!
Conclusion
Grilling bone-in chicken thighs on a gas grill might seem a bit daunting at first, but with the right approach, it’s quite straightforward. By understanding heat zones, trusting your meat thermometer, and allowing for proper rest, you’ll consistently achieve tender, juicy chicken with deliciously crispy skin. Practice makes perfect, and every grill session is a chance to refine your technique. Enjoy the process and the fantastic results!
How long does it take to grill bone-in chicken thighs on a gas grill?
Typically, it takes about 25-35 minutes to grill bone-in chicken thighs on a gas grill, depending on their size and your grill’s exact temperature. Always cook until the internal temperature reaches 175°F.
Should I grill bone-in chicken thighs skin-side up or down first?
It’s generally best to start bone-in chicken thighs skin-side down over indirect heat. This allows the fat to render slowly and the skin to crisp up nicely without burning.
What internal temperature should bone-in chicken thighs reach?
Bone-in chicken thighs should reach an internal temperature of 175°F (79°C) in the thickest part of the meat, away from the bone, to be safely cooked and deliciously tender.
How do I prevent chicken thighs from drying out on the grill?
To prevent chicken thighs from drying out, use a meat thermometer to avoid overcooking and pull them off the grill promptly at 175°F. Also, letting them rest for 5-10 minutes after grilling helps keep the juices locked in.
Is it better to use indirect or direct heat for grilling bone-in chicken thighs?
Using both indirect and direct heat is ideal. Start with indirect heat to cook the thighs through evenly without burning the exterior, then finish over direct heat for a few minutes to crisp the skin and get nice grill marks.