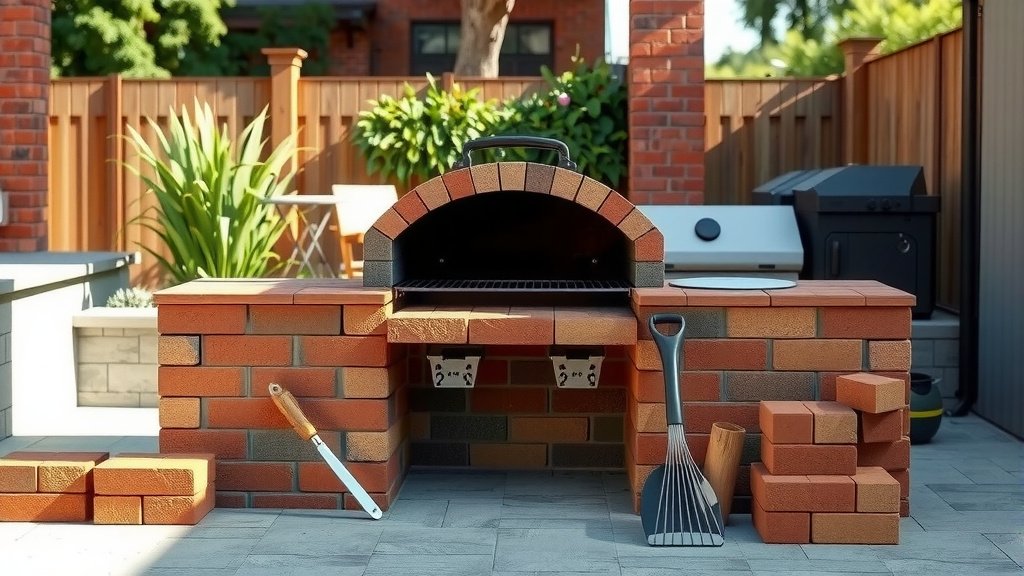
Building an outdoor grill with brick involves careful planning, a solid foundation, and methodical bricklaying to create a durable and functional cooking space.
To construct a brick grill, you’ll need essential materials like firebricks, refractory mortar, concrete for the base, and steel reinforcing bars, along with basic masonry tools.
- Planning your brick grill includes choosing a safe spot and creating a clear design.
- A sturdy concrete foundation is absolutely critical for your grill’s long-term stability.
- Laying bricks correctly, using proper mortar, ensures the structure will last for years.
- Don’t forget to build in good airflow and plan for your specific grill grate size.
- Curing your finished grill with a small, slow fire is an important final step.
How To Build A Outdoor Grill With Brick?
Building an outdoor grill with brick is a rewarding project that gives you a sturdy, permanent cooking fixture. This guide will walk you through the essential steps, ensuring your new grill is both safe and functional.
From planning the perfect spot to curing your finished masterpiece, we’ll cover everything you need to know. Imagine the delicious meals you’ll create in your custom-built outdoor kitchen centerpiece.
Why Choose a Brick Grill?
Opting for a brick grill brings a touch of classic charm and incredible durability to your outdoor space. Unlike portable units, a brick grill becomes a permanent, beautiful fixture in your yard.
Beyond aesthetics, brick offers excellent heat retention properties. This means more consistent cooking temperatures and better fuel efficiency, according to many grilling enthusiasts. You’ll find your food cooks more evenly.
Planning Your Outdoor Brick Grill
Every great project begins with thoughtful planning. Before you mix your first batch of mortar, take time to design and prepare your grill’s future home. This initial phase is where you prevent future headaches.
Picking the Perfect Spot
Choosing the right location is paramount for both safety and convenience. You’ll want a level area, away from combustible materials like wooden fences or overhanging branches (National Fire Protection Association guidance suggests ample clearance). Consider wind direction, too; you don’t want smoke blowing into your living space.
Think about how you’ll access the grill. Is it close enough to your kitchen for prep, but not so close that it becomes a fire hazard? A spot that feels integrated into your outdoor living area is often ideal.
Local Rules and Permits
Before any digging begins, it’s wise to check with your local municipality or homeowner’s association. Many areas have specific building codes or permit requirements for permanent outdoor structures. Taking this step early can save you time and potential fines down the road.
Designing Your Grill Layout
What size and shape grill do you envision? Do you want a simple firebox, or perhaps a larger unit with prep counters and storage? Sketching out your design, including the dimensions for your grill grate, helps visualize the final product. We found that a good design saves a lot of guesswork later.
Consider the height you’ll be comfortable cooking at. A typical cooking surface height is around 32-36 inches. This planning ensures your grill is not only functional but also comfortable for you to use.
Essential Materials and Tools
Having all your materials and tools ready before you start will make the construction process much smoother. It’s like baking a cake; you wouldn’t start without all your ingredients, right?
You’ll need quality bricks, mortar specifically for high-heat applications, concrete for the foundation, and your chosen grill grate. Don’t forget the right tools to handle these materials safely and efficiently. Many professionals emphasize quality tools for quality results.
- Standard building bricks (for outer walls)
- Firebricks (for the firebox)
- Refractory mortar or high-heat cement mix
- Concrete mix (for foundation)
- Rebar or steel lintels (for support)
- Grill grate and charcoal grate
- Trowel, spirit level, rubber mallet
- Measuring tape, string line, chalk line
- Wheelbarrow, buckets, mixing hoe
- Safety glasses and gloves
Building the Foundation
A brick grill is heavy, and it needs a rock-solid foundation to prevent settling and cracking over time. Think of it as the feet of your grill; if they’re unstable, the whole structure will suffer. This step is non-negotiable for longevity.
You’ll start by digging a trench that extends beyond the grill’s footprint, usually about 6-12 inches deep, depending on your soil and local frost line. Pouring a concrete slab within this trench creates a stable, level base for your entire grill structure.
Laying the Bricks: Step-by-Step Guide
Now for the satisfying part: watching your grill take shape course by course! This requires patience and precision, but the reward is a truly unique cooking station. Remember, slow and steady often wins the race when it comes to masonry.
Starting the First Course
Always begin by dry-laying your first course of bricks. This lets you adjust spacing and ensure everything fits without wasting mortar. Once you’re happy, mix your high-heat mortar according to the manufacturer’s instructions; consistency is key here. Lay your first course of bricks, making sure they are perfectly level and square.
This initial layer is arguably the most important, as it sets the alignment for the entire structure. Many experts say to double-check your measurements at this stage. Any mistakes here will compound as you build up.
Stacking Courses for Strength
As you build upwards, stagger the brick joints on each successive course. This overlapping pattern is called a “running bond” and it gives the structure incredible strength. Think of it like a puzzle where each piece supports the next.
Continuously check your work with a level and plumb bob to ensure the walls are straight and true. A little adjustment now is much easier than fixing a crooked wall later. Research shows that proper joint staggering prevents structural weaknesses.
| Brick Course Number | Typical Purpose | Key Feature |
|---|---|---|
| Courses 1-4 | Base support and foundation enclosure | Solid, level perimeter |
| Courses 5-8 | Firebox walls (sides and back) | Firebrick lining, stable height |
| Course 9+ | Grill grate support and chimney (if applicable) | Ledges, rebar support |
Creating the Firebox Opening
As you reach the height where your charcoal grate will sit, you’ll need to create an opening for the firebox. This is usually formed by leaving out bricks and supporting the courses above with steel lintels or rebar. The opening should be wide enough for your charcoal grate and easy ash removal.
Measure your charcoal grate and plan the opening accordingly. Remember to factor in a little extra space for airflow and ease of use. A well-designed firebox ensures you can manage your coals effectively.
Ensuring Proper Airflow
For a good, even burn, your grill needs airflow. You can achieve this by leaving small gaps in the lower courses of bricks, or by incorporating dedicated vents. These openings allow oxygen to reach the coals, preventing a sluggish fire. It’s like breathing; your fire needs air to thrive.
Some designs incorporate a larger opening at the bottom for ash cleanout, which also doubles as an air intake. Research indicates that good airflow is a cornerstone of efficient grilling (Grill Master’s Handbook).
Installing the Grill Grate and Finishing
Once your brickwork is complete and the mortar has set, it’s time to prepare for your cooking surface. You’ll need to install ledges or brackets inside the firebox to support your grill grate at various cooking heights. This gives you flexibility in your grilling.
Choosing a good quality grill grate, like cast iron or heavy-duty stainless steel, will make a big difference in your cooking experience. After installing the supports, allow your mortar to cure fully for several days, or even weeks, depending on the product instructions. This slow drying process strengthens the mortar considerably.
Your First Grill: The Curing Fire
Before you host your first BBQ bash, your new brick grill needs a proper “curing” fire. This is a very small, slow-burning fire that gradually heats the brick and mortar, allowing any remaining moisture to escape and the materials to fully harden. Starting with a large, hot fire immediately could cause cracking.
Build a modest fire, perhaps with just a handful of charcoal or small wood scraps, and let it burn for an hour or two. Repeat this a few times over several days, slowly increasing the heat. This patience now means your grill will last for many delicious years.
Conclusion
Building your own outdoor brick grill is more than just a construction project; it’s an investment in countless future memories and delicious meals. While it requires careful planning and a bit of elbow grease, the satisfaction of cooking on a grill you built yourself is truly unmatched. You’ve created a durable, beautiful centerpiece that will serve you well for years to come. So, go ahead, fire it up, and enjoy the fruits of your labor!
FAQ: How long does it take to build a brick grill?
The time to build a brick grill can vary significantly depending on your experience level, the complexity of your design, and how much time you can dedicate each day. Many DIY enthusiasts find it takes anywhere from 3 to 7 full days of work, not including the concrete foundation’s curing time. Patience is more important than speed for a lasting structure.
FAQ: What kind of bricks should I use for an outdoor grill?
For the outer structure and non-heat-exposed parts, regular clay building bricks work well. However, for the firebox walls and any areas directly exposed to heat, you absolutely must use firebricks (also called refractory bricks). Firebricks are designed to withstand high temperatures without cracking or spalling, which is crucial for safety and durability (Masonry Magazine often highlights this).
FAQ: Can I use regular mortar for a brick grill?
While regular mortar can be used for the exterior, cooler parts of the grill, it is not suitable for the firebox. For areas that will be directly exposed to high heat, you need to use refractory mortar or a high-heat cement mix. Regular mortar will degrade and crumble under intense heat, compromising the grill’s structural integrity. Always check the mortar’s heat rating.
FAQ: How much does it cost to build a brick grill?
The cost to build a brick grill can range widely, typically from $300 to $1,000 or more, depending on the size, materials chosen, and any additional features. Bricks, mortar, concrete, and the grill grates are the main expenses. If you opt for firebricks throughout or add extensive workspace, the cost will increase. Doing the labor yourself significantly reduces overall expense.
FAQ: Is a brick grill better than a metal grill?
A brick grill offers superior heat retention and distribution compared to most metal grills, leading to more consistent cooking temperatures. They are also incredibly durable and can last for decades. However, they are permanent, lack portability, and can take longer to heat up. Metal grills are more versatile and often cheaper initially, but typically have a shorter lifespan. It really depends on your grilling style and needs.