You can cook delicious spare ribs on a gas grill by using a two-zone cooking method: high heat initially for searing, then low, indirect heat for slow cooking until tender.
This method ensures juicy, flavorful ribs that fall off the bone without drying out, making your spare ribs a true crowd-pleaser.
- Prepare your spare ribs by removing the membrane and seasoning them generously.
- Set up your gas grill for two-zone cooking, aiming for an indirect heat of around 250-275°F (120-135°C).
- Sear the ribs briefly over direct heat, then move them to the cooler, indirect side for several hours.
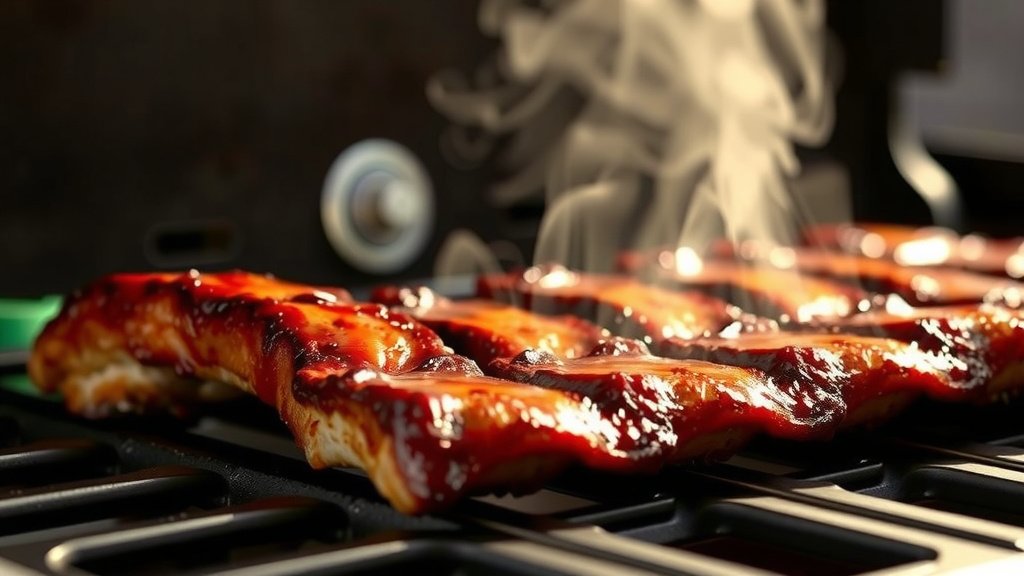
- Apply BBQ sauce in the final hour of cooking to prevent burning and build a glaze.
- Let your perfectly cooked ribs rest before slicing to keep all those wonderful juices locked in.
How Do You Cook Spare Ribs On A Gas Grill?
Cooking spare ribs on a gas grill involves a combination of initial preparation, precise temperature control, and patience. The goal is to achieve fall-off-the-bone tenderness and rich flavor, which a gas grill can certainly deliver.
Getting Your Ribs Ready for the Grill
Before any heat touches your ribs, proper preparation is key. This initial step can drastically improve your results on the grill. Many experienced grill masters agree that attention here pays off.
Choosing the Right Spare Ribs
When you’re at the butcher or grocery store, you might see a few options. We found that St. Louis-style spare ribs are often preferred. They are trimmed to a uniform rectangular shape, making them easier to cook evenly (USDA).
These ribs have a good meat-to-bone ratio and are less fatty than untrimmed spare ribs. This makes them a fantastic choice for grilling, providing a consistent surface for heat.
Prepping Your Ribs: Membrane and Trim
This part is non-negotiable for tender ribs. You need to remove the silver skin membrane from the bone side. It’s tough and will prevent your ribs from becoming as tender as they should be.
To do this, simply slide a knife under the membrane at one end. Lift it with a paper towel for grip, then pull firmly. You might also want to trim any large, loose flaps of meat or excess fat, ensuring even cooking and presentation.
The Magic of Seasoning
Once trimmed, it’s time for flavor. A good dry rub is your best friend here. Don’t be shy; apply your rub generously on all sides of the ribs. We found that allowing the rub to sit on the ribs for at least 30 minutes, or even overnight in the fridge, allows the flavors to deepen.
Many experts say this resting period helps the rub penetrate the meat. This step builds a delicious crust and a complex flavor profile that really shines through after grilling.
Setting Up Your Gas Grill for Success
Your grill isn’t just a heat source; it’s a tool for precision. Proper setup is vital for slow-cooked perfection. Think of it like setting the stage for a culinary show.
Two-Zone Cooking: Your Secret Weapon
This technique is how you achieve tender, smoky ribs on a gas grill. You’ll set up your grill with one side on high heat and the other off. This creates a direct and indirect cooking zone.
For spare ribs, you want to cook them primarily over indirect heat. This allows for slow, gentle cooking, mimicking a smoker. Research often connects this method to more tender and juicy results compared to direct grilling (Meat Science Journal).
Maintaining a Consistent Grill Temperature
Your target temperature for indirect cooking is around 250-275°F (120-135°C). This low and slow approach is what makes ribs so good. Use your grill’s lid thermometer, but a separate digital thermometer is always more accurate.
Adjust your active burners as needed to maintain this range. You’ll become a temperature control wizard with a little practice, ensuring your ribs cook evenly without burning.
Quick Grill Setup Checklist
- Clean grates: Prevents sticking and off-flavors.
- Fuel check: Enough gas for several hours of cooking.
- Two-zone setup: One side burners on, other side off.
- Thermometer: Calibrated grill thermometer or digital probe.
- Drip pan: Under indirect zone to catch drippings.
Grilling Your Spare Ribs: Step-by-Step
Now for the fun part! This is where your preparation meets the heat. Be patient, and your reward will be succulent, flavorful ribs.
Searing for Flavor (Optional but Recommended)
Some grillers like to start by searing the ribs over direct high heat for 10-15 minutes, flipping them once or twice. This creates a nice crust and deepens the flavor (culinary experts).
If you choose to sear, make sure your grill is hot. Then, quickly move them to the indirect side. This quick burst of heat can make a difference in texture and taste.
The Slow Cook Phase
Place your ribs on the indirect side of the grill, bone-side down. Close the lid and let the magic happen. You’re looking for a total cooking time of about 2.5 to 4 hours, depending on the ribs and your grill.
Check the temperature every hour or so, making small adjustments as needed. Resist the urge to constantly open the lid; “if you’re looking, it’s not cooking.” Each time you open it, heat escapes, slowing down the process.
When to Add BBQ Sauce
If you’re using BBQ sauce, apply it in the last 30-60 minutes of cooking. Adding it too early will cause it to burn, creating a bitter taste. A few thin layers are usually better than one thick one, building a beautiful, caramelized glaze.
Checking for Doneness
How do you know when they’re done? Look for these signs. The meat should pull back from the bone ends. When you lift a rack with tongs, it should have a significant bend, almost like it’s about to break. Many people agree that tender, not mushy, is the goal.
Another reliable method is the twist test: grab a bone and gently twist it. If it moves easily, or even comes clean, your ribs are likely ready. The internal temperature, when measured near the bone, should be around 195-205°F (90-96°C) for optimal tenderness.
| Doneness Sign | What It Looks Like | What It Feels Like |
|---|---|---|
| Meat Pullback | Meat visibly recedes from bone ends. | Looks “done” and ready. |
| Bend Test | Ribs bend significantly when lifted, almost splitting. | Very flexible, but not falling apart. |
| Twist Test | An individual bone easily twists or comes out. | Little resistance when twisting a bone. |
| Internal Temp | 195-205°F (90-96°C) near the bone. | Probe slides in with little resistance. |
Resting Your Ribs: Don’t Skip This!
Once your ribs are perfectly cooked, take them off the grill and let them rest. Wrap them loosely in foil and let them sit for 10-15 minutes. This step is just as important as the cooking itself.
Resting allows the juices to redistribute throughout the meat, making them even more tender and flavorful. If you cut them immediately, those precious juices will run out, leaving you with drier ribs.
Troubleshooting Common Rib Issues
Even seasoned grillers face challenges. Understanding these can help you avoid or fix them, ensuring your next batch of ribs is better than the last.
Ribs Too Dry?
Dry ribs usually mean they cooked too hot or too long. Make sure your indirect heat stays within the 250-275°F (120-135°C) range. You can also use a water pan on the indirect side to add moisture to the cooking environment.
Wrapping ribs in foil with a little apple juice or broth for part of the cooking (often called the “Texas Crutch”) can also help keep them moist. This is a great trick for ensuring a juicy result.
Ribs Not Tender Enough?
If your ribs are tough, they simply need more time on the grill. Remember, low and slow is the mantra for ribs. Don’t rush the process, even if it takes longer than expected. Patience is a virtue when you’re aiming for fall-off-the-bone tenderness.
Double-check your grill temperature to make sure it’s not too low. Too low a temperature means it will take much longer to break down the connective tissues. Stick to that sweet spot of 250-275°F.
Conclusion
Cooking spare ribs on a gas grill might seem like a daunting task, but with the right preparation and techniques, you can achieve amazing results. By focusing on two-zone cooking, temperature control, and proper resting, you’ll be serving up tender, flavorful ribs every time. Remember, grilling is a journey, and each time you fire up your grill, you gain more confidence and skill. Enjoy the process, and most importantly, enjoy those delicious ribs!
How do I prevent my ribs from burning on a gas grill?
To prevent burning, always cook spare ribs over indirect heat for the majority of the time. Keep a close eye on your grill temperature, aiming for 250-275°F (120-135°C), and only add BBQ sauce during the final 30-60 minutes of cooking.
Should I wrap my spare ribs in foil on a gas grill?
Wrapping ribs in foil, sometimes called the “Texas Crutch,” is an option to speed up cooking and keep them moist. You can wrap them after 1.5-2 hours of indirect cooking for about an hour, then unwrap and finish cooking to develop a crust.
What’s the best wood chip for adding smoke flavor to ribs on a gas grill?
For a gas grill, hickory or apple wood chips are popular choices for ribs. Soak them for about 30 minutes, then place them in a smoker box or a foil pouch with holes, directly over a lit burner to create smoke for the indirect cooking zone.
How do I know if my gas grill temperature gauge is accurate?
Grill lid thermometers can be unreliable. To check accuracy, use a separate, oven-safe digital thermometer clipped to the grates in the indirect cooking zone. This will give you a much more precise reading of the temperature your ribs are actually experiencing.
Can I marinate spare ribs instead of using a dry rub?
Yes, you can marinate spare ribs. A marinade can add moisture and flavor, but it typically won’t create the same crust as a dry rub. If marinating, make sure to pat the ribs dry before grilling to help them brown properly.