How to gas grill chicken legs effectively involves setting up your grill for two-zone cooking: one side hot for searing, the other cooler for indirect cooking.
You should aim for an internal temperature of 175-180°F (80-82°C) in the thickest part of the leg for tender, juicy results, using a reliable meat thermometer.
Here’s a quick overview of what you’ll learn:
- Setting up your gas grill for both direct and indirect heat zones.
- The best way to prepare your chicken legs for grilling, including seasoning.
- Step-by-step guidance on how to grill, from searing to finishing.
- How to ensure your chicken legs are perfectly cooked and safe to eat.
- Tips for achieving crispy skin and tender, juicy meat every time.
How To Gas Grill Chicken Legs?
Grilling chicken legs on a gas grill means mastering temperature control for crispy skin and juicy meat. It’s all about creating different heat zones and knowing when to use them.
Why Choose Chicken Legs for Gas Grilling?
Chicken legs are a fantastic choice for grilling. They are flavorful, forgiving, and generally more economical than other cuts. Their bone-in nature helps them stay moist while cooking.
You will find they withstand the grill’s heat wonderfully. The darker meat also offers a richer flavor profile that many people adore.
Selecting Your Chicken Legs
When you’re at the store, look for chicken legs that are plump and have a healthy pink color. Avoid any that look dry or discolored. Freshness makes a big difference in taste and texture.
Many experts say that choosing organic or free-range chicken can sometimes improve flavor and quality. However, standard chicken legs grill up beautifully too.
Essential Prep for Juicy, Crispy Legs
Before any heat hits your chicken, a little preparation goes a long way. This ensures even cooking and that desirable crispy skin.
Patting Dry and Trimming
Always start by patting your chicken legs very dry with paper towels. This removes excess moisture, which is key for crispy skin. Moisture creates steam, which prevents browning.
You might also want to trim any large pieces of excess skin or fat. While some fat adds flavor, too much can cause flare-ups on the grill.
Seasoning Your Chicken Legs
Seasoning is where you build flavor. Don’t be shy! A well-seasoned chicken leg is a delicious one.
- Simple Salt and Pepper: Sometimes, less is more. A generous amount works wonders.
- Garlic Powder and Paprika: These are classic additions that provide a mild, savory depth.
- Herbs: Dried thyme, oregano, or rosemary can add an aromatic touch.
- Chili Powder or Cayenne: If you like a little kick, these spices wake up the flavor.
- Your Favorite Dry Rub: There are countless commercial rubs that work perfectly.
Rubs vs. Marinades: What’s Your Style?
Dry rubs are fantastic for creating a flavorful crust. Apply them liberally and let them sit for at least 30 minutes, or even overnight in the fridge. This really allows the flavors to penetrate.
Marinades offer moisture and flavor. They often contain an acid (like vinegar or citrus juice) which helps tenderize the meat. Marinate chicken legs for at least 2 hours, but no more than 12, to avoid making the meat mushy.
Mastering Your Gas Grill Setup
A gas grill gives you precise control over heat. Learning how to use it for two-zone cooking is a game-changer for chicken legs.
Understanding Two-Zone Cooking
This technique involves creating a hot zone and a cooler, indirect zone on your grill. The hot zone is for searing and getting that crispy skin, while the indirect zone gently cooks the chicken through without burning it.
To set it up, simply turn on the burners on one side of your grill to medium-high heat. Leave the burners on the other side off. This creates your direct and indirect zones.
Ideal Grill Temperatures
Preheating is vital. Always close the lid and let your grill preheat for 10-15 minutes. This ensures the grates are hot enough for searing and the ambient temperature is stable.
| Grill Zone | Target Temperature | Purpose |
|---|---|---|
| Direct Heat | 400-450°F (200-230°C) | Searing and Crisping Skin |
| Indirect Heat | 325-350°F (160-175°C) | Slow Cooking to Doneness |
The Step-by-Step Gas Grilling Process
With your grill preheated and your chicken prepped, you’re ready for action. This method ensures flavorful, perfectly cooked chicken legs.
Starting with Direct Heat for Searing
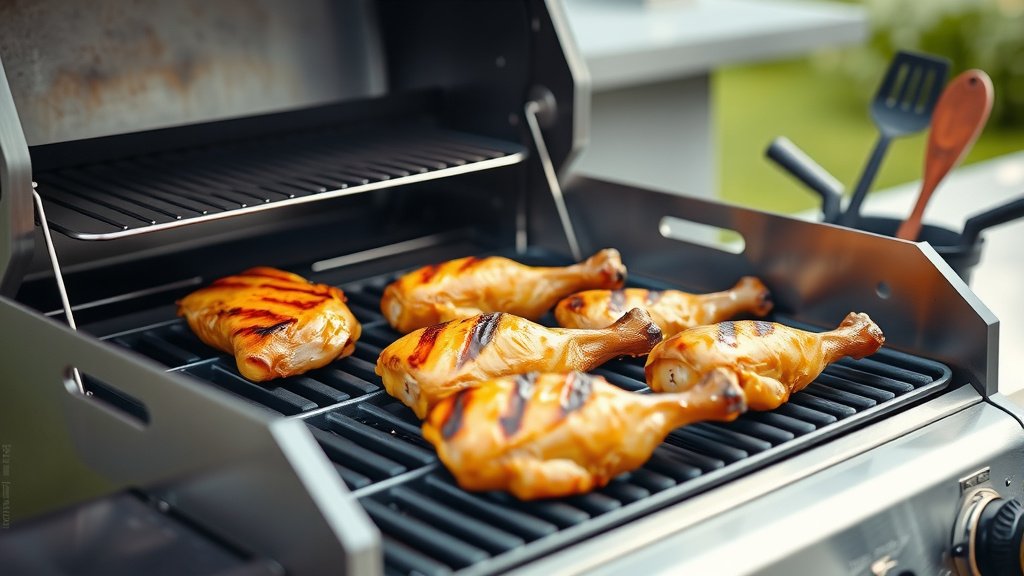
Place your seasoned chicken legs skin-side down over the direct, hot heat. Close the lid and let them sear for about 3-4 minutes. You are looking for a nice golden-brown crust and crispy skin.
Keep an eye out for flare-ups. If they occur, move the chicken to a slightly less hot part of the direct zone or briefly to the indirect zone. Flip the chicken legs and sear for another 3-4 minutes on the other side.
Finishing with Indirect Heat
Once both sides are nicely seared, move the chicken legs to the indirect heat side of your grill. Close the lid and let them cook gently. This is where the magic happens, ensuring the inside cooks evenly.
Turn the chicken every 10-15 minutes to promote even cooking. Resist the urge to constantly open the lid, as this releases heat and slows the cooking process.
Grilling Times to Expect
Chicken legs typically take about 30-45 minutes total to grill using the two-zone method. This includes the initial searing time. Thicker legs will, of course, take a bit longer.
Remember, these are guidelines. The real indicator of doneness is the internal temperature, not just the clock. Grill conditions can vary widely.
Checking for Doneness: Your Meat Thermometer is Key
You cannot tell if chicken is safe and done by looking at it. A reliable meat thermometer is your best friend here. Always check the temperature.
Safe Internal Temperature for Chicken Legs
According to USDA guidelines, all poultry, including chicken legs, must reach a minimum internal temperature of 165°F (74°C). However, for bone-in chicken like legs, many chefs and home cooks aim for a slightly higher temperature, around 175-180°F (80-82°C).
This higher temperature helps break down tough connective tissues, resulting in more tender and juicy dark meat. We found that cooking to 175-180°F often yields better texture for legs.
Here’s a quick doneness checklist:
- Insert your meat thermometer into the thickest part of the chicken leg, avoiding the bone.
- Ensure the temperature reads 175-180°F (80-82°C).
- The juices should run clear, not pink, when you pierce the meat.
- The meat should pull easily from the bone when tested.
The Final Rest: Why It Matters
Once your chicken legs reach the target temperature, remove them from the grill and place them on a clean cutting board or platter. Tent them loosely with foil and let them rest for 5-10 minutes.
This resting period allows the juices to redistribute throughout the meat, making each bite incredibly tender and moist. Skipping this step often results in drier chicken.
Troubleshooting Your Gas Grilled Chicken Legs
Even experienced grillers can run into issues. Don’t worry, many common problems have simple solutions.
If your chicken is browning too fast on the outside but is still raw inside, your direct heat might be too high. Move it to the indirect side sooner. If it’s taking too long, your indirect heat might be too low, or you might be opening the lid too frequently.
Flare-ups from dripping fat are common. Keep a spray bottle of water handy to spritz down small flames. Also, trimming excess fat beforehand can help prevent them.
Conclusion
Mastering how to gas grill chicken legs is an accessible and rewarding culinary skill. By understanding two-zone cooking, proper preparation, and knowing when your chicken is truly done, you can consistently produce flavorful, juicy, and crispy results. Take your time, trust your thermometer, and enjoy the process. Happy grilling!
What kind of gas grill is best for chicken legs?
Any gas grill with at least two burners that allows you to create separate direct and indirect heat zones will work well for chicken legs. The size of your grill simply determines how many legs you can cook at once.
Should I brine chicken legs before grilling?
Brining chicken legs can certainly enhance moisture and flavor, especially if you tend to overcook them slightly. A simple saltwater brine for an hour or two can make a noticeable difference in juiciness. It’s a great extra step for even more tender results.
How do I prevent chicken legs from sticking to the grill?
To prevent sticking, make sure your grill grates are clean and hot before you place the chicken on them. You can also lightly oil the grates just before adding the chicken, using a paper towel dipped in high-smoke-point oil, held with tongs.
Can I grill frozen chicken legs?
No, it is not recommended to grill chicken legs from frozen. They will cook unevenly, and the outside may burn before the inside is safely cooked. Always thaw chicken legs completely in the refrigerator before grilling to ensure safe and consistent cooking.
What are some good side dishes for grilled chicken legs?
Grilled chicken legs pair wonderfully with classic BBQ sides. Think about creamy coleslaw, grilled corn on the cob, potato salad, a fresh green salad, or even grilled vegetables like asparagus or bell peppers. The robust flavor of the chicken legs complements many different dishes.